Table of Contents
The Utilities Tab
Introduction
Modeling is often the assembly of several simple objects, with the goal of creating a complex one, such as when a link, duplicated several times in rotation, becomes a chain. Like making complex multiple copies, Hexagon offers a great number of tools which will help you with your modeling of varied objects.
Stretch
![]() The stretch tool lets you edit the structure of objects, much like the basic
3D Manipulators. This tool is more used for modifying curves or surfaces
constructed with curves.
The stretch tool lets you edit the structure of objects, much like the basic
3D Manipulators. This tool is more used for modifying curves or surfaces
constructed with curves.
This tool also is the only one to modify certain dynamic geometry, like the construction forms for an arc, or the depth of a boolean punch.

From left to right: a series of edges stretched with a horizontal constraint.
Usage:
- Select the form or curve to be modified.
- Select the stretch tool in the Utilities tab.
- Click on the structure of your object, curve or control form to affect it.
- The movement could be done in two ways: a short click to select the entity, move it and then another short click to define the final position, or a click-drag on the entity to move it, releasing the mouse to define the new position.
- Validate the tool to finish the operation.
Options:
 Stretch along the normal: Moves the selected entity perpendicular to the surface or line to which it belongs.
Remarks:
- When you select the stretch tool, if the select object is the current selection mode, the mode will change to select auto.
- If several entities, such as facets, are selected together, and the option stretch along the normal is activated, the entities are deformed in a way that respects the move.
Keyboard shortcut: Space bar: Lets you apply a horizontal, vertical or no constraint when moving a selection. See the use of 3D rulers.
Lay On
![]() The lay on tool lets you reposition one object on another, so that the selected
faces are against each other, aligning the center of each face.
The lay on tool lets you reposition one object on another, so that the selected
faces are against each other, aligning the center of each face.
Positioning objects that are not situated in the traditional 3D axes can be problematic. For example, this tool can help you place a logo on an inclined surface, so that the angle is a perfect match between the two objects.

Left: the object to lay on. Right: the object in its final position.
Usage:
- Select the object you want to displace.
- Select the lay on tool in the Utilities tab.
- Click on the face which will be the start of the move. Multi-selection is impossible.
- Click on a face of the destination object to define the new position and orientation of the original object.
Options:
 Inversion on/off: lets you place the object on one side or another of the newly positioned face.
- Rotation: lets you rotate the object around the center axis perpendicular to the newly positioned face.
Snap/Align
![]() The snap/align tool lets you displace an object by way of a starting point,
often placed on the object to be moved, towards an arrival point, or align an object
in relation to another object.
The snap/align tool lets you displace an object by way of a starting point,
often placed on the object to be moved, towards an arrival point, or align an object
in relation to another object.
Snap is placing an object precisely on another object. Alignment is placing one object precisely in relation to another object
Snap can be useful to precisely position an object on another. This tool will easily place a cushion on a chair, or a teacup on its saucer.
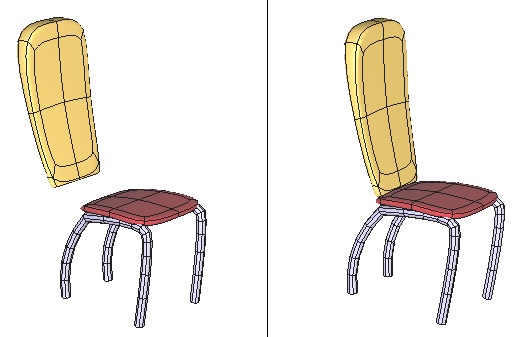
Left: the objects before snapping. Right: the objects in their final position.
Alignment is useful for placing one object precisely in relation to another object. Use this tool to align wheels on a car together.
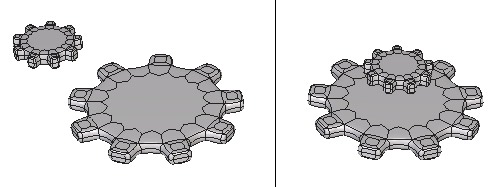
Left: the objects to align. Right: the objects are aligned along the vertical axis.
Usage:
- Select the object you wish to move.
- Select the snap/align tool in the Utilities tab.
- Click on a reference point of the object to be moved.
- Click on another point present in the scene, including the currently selected object, or enter a precise location in the tool properties palette.
- If necessary, use the space bar to apply a horizontal or vertical constraint, in which case the object would move along that plane, while also taking in account the arrival point.
- To make an alignment, it is sometimes necessary to make several axis constraints in a row.
Remarks:
- The snap/align tool works on selections of points, edges and faces. If a selection is made before you select the tool, the alignment is made only on this selection.
- Use the Shift key to snap to a point in the scene, including hidden points, such as the midpoint of an edge, or the geometric center of a shape.
Keyboard shortcut: Space bar: Lets you apply a horizontal or vertical or no constraint when aligning.
Taper, Bender and Twister
![]()
![]()
![]() The Taper, Bender and Twister tools are global modifiers, which let you
apply a transformation on the whole object or on a previously made selection on
an object. The three tools function the same.
The Taper, Bender and Twister tools are global modifiers, which let you
apply a transformation on the whole object or on a previously made selection on
an object. The three tools function the same.

From left to right: the original object, then tapered, bent and twisted.
Usage:
- Select an object to deform.
- If needed, in select point mode, make a selection of the area to apply the distortion.
- Select the Taper, Bender or Twister tool in the Utilities tab. A red and yellow bounding box appears.
- In the tool properties palette, modify the axis of deformation of the bounding box, if needed.
- Click-drag on the yellow rectangles to deform the object or selection, in function of a ratio of minimum/maximum, or by using +/- on the numbers keypad, or enter a precise value in the tool properties palette.
- Validate the tool to finish the operation.
Options:
 Horizontal Axis: orients the bounding box to the horizontal axis.
 Vertical Axis (default): orients the bounding box to the vertical axis.
 Depth Axis: orients the bounding box to the Z axis.
Remarks:
- These tools will function on a group, but not on a point selection within a group.
Keyboard shortcuts:
- Space bar: lets you change the deformation axis, or jump between the three options for these tools.
- +/- (on the number keypad): Increases/decreases the deformation applied to the selection
Deformer (NFFD)
![]() The “Deformer” tool, also known as the NURBS-based Free Form Deformation (NFFD)
cage, lets you globally modify the shape of an object, by modifying a three
dimensional matrix of vertices which form a cage around the object.
The “Deformer” tool, also known as the NURBS-based Free Form Deformation (NFFD)
cage, lets you globally modify the shape of an object, by modifying a three
dimensional matrix of vertices which form a cage around the object.
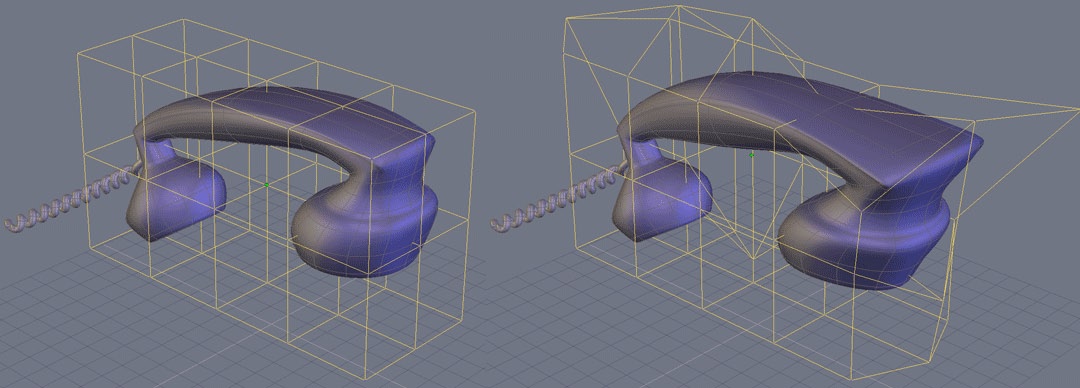
On the left, the original object, on the right, the deformed object.
Usage:
- Select the object to deform.
- If needed, select, in vertex selection mode, the part of the object to deform.
- Select the “Deformer” tool, located in the “Utilities” tool tab: a deformation cage is displayed around the object.
- Using the manipulators, and in vertex or edge selection modes only, deforms the cage to get a global or local deformation of your object, according to the selection you will have done previously.
- If needed, modify the definition of the deformation cage for greater or less precision.
- Validate to end the deformation.
Options:
 Adjust the box: Lets you change the definition of the cage.
Remark:
- This tool works on groups, but does not work on selections inside a group.
Bend
![]() The bend tool lets you bend an object with reference to a 2D line.
The bend tool lets you bend an object with reference to a 2D line.

Left: the object before and the deformation curve. Right: the bent object.
Usage:
- Using an existing curve as a guide:
- Draw a curve to be used as the guide to the deformation.
- Select the object to bend.
- Select the bend tool in the Utilities tab.
- Click on the curve to bend the selected object.
- Drawing a new guide curve:
- Select the object to bend.
- Select the bend tool in the Utilities tab.
- Draw a curve to be used as the guide to the deformation, using a tool in the Lines tab, without leaving the bend tool
- Validate the tool to finish the curve, and apply the deformation.
Remarks:
- This tool works only with curves in a 2D plane.
Copy
![]() The copy tool lets you create a copy of an object, with the clone option if
needed.
The copy tool lets you create a copy of an object, with the clone option if
needed.
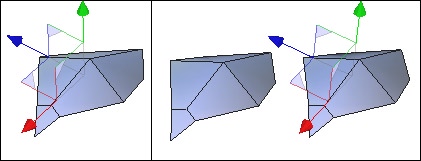
Left: The original object. Right: the same object and its copy.
Usage:
- Select the copy tool, in the Utilities tab.
- Click on the object to copy: the object stays at its initial position, but a copy appears, and moves in relation to your mouse.
- Click to validate the new position of the copy.
Options:
 Clone On/Off: Lets you create a dynamic relationship between the two objects: if the topology of one object is modified, the same operation is carried out on the cloned copy.
Remarks:
- Not to be confused with copy and paste, or clone, because it lets you copy an object with a precise numerical placement if necessary.
- Use the duplicate function from the Edit menu to create a cloned copy of the current object.
Keyboard shortcut: Space bar: Lets you apply a horizontal, vertical or no constraint when moving the copy.
Multiple Copies
![]() The multiple copies tool lets you make multiple copies of a selected object,
with the clone option if needed. You can also apply precise multiple modifications
to all copies, if needed.
The multiple copies tool lets you make multiple copies of a selected object,
with the clone option if needed. You can also apply precise multiple modifications
to all copies, if needed.
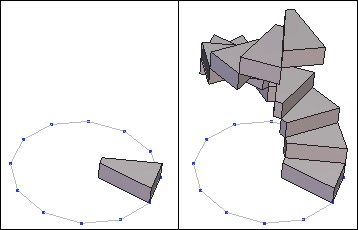
Left: the original object. Right: the multiple copies of this object with rotation and movement applied to each copy.
Usage:
- Click on the object to copy.
- Select the multiple copies tool in the Utilities tab.
- Define any options as needed. In the tool properties palette, define:
- The number of copies wanted (in addition to the original).
- The X, Y and Z movements to be applied to each copy.
- The X, Y and Z rotations to be applied to each copy.
- The X, Y and Z scale to be applied to each copy
- Validate the tool to finish the operation.
Options:
 Clone On/Off: lets you create a dynamic relationship between all the copied objects: if the topology of one object is modified, the same operation is carried out on all the clones.
 Rotation pivot: this reference point, to be selected on the initial object to be copied, will be the point on which the eventual rotations are performed on each copy.
Copy on a Support
![]() Unlike the multiple copies tool, this tool bases itself on a structure to
generate multiple copies. This structure could be a surface, volume or 2D curve.
Unlike the multiple copies tool, this tool bases itself on a structure to
generate multiple copies. This structure could be a surface, volume or 2D curve.
It the case of a 3D form, the tool bases itself on each polygon, and with a 2D curve, on its vertices.

Left: the object to be duplicated and the support object. Right: the result of the copy.
Usage:
- Create the form on which the copy will be based.
- Select the object to be duplicated.
- Select the copy on a support tool, in the Utilities tab.
- Click on the form to base the copy on. The copies are created.
- Modify the orientation and the copy options in the tool properties palette.
- With the +/- keys on the numbers keypad, increase or decrease the size of your copies.
Options:
 Clone On/Off: Lets you create a dynamic relationship between the copied objects: if the topology of one object is modified, the same operation is carried out on the clones.
- Orientation: lets you choose an orientation of the copies, in reference to the support.
 Invert orientation: lets you mirror the orientation of the copies, in reference to the support.
 Scale: when the support is a line, this option allows you to create copies of progressively variable sizes, with the original size being at the start of the line, and the bigger or smaller size being at the end of the line.
 Center point: lets you define a reference point on the object to copy. This point is the connection point of each copy on the support and the center of rotation when a rotation value is input.
Cut Into Slices
![]() The cut into slices tool lets you cut an object into parallel slices, perpendicular
to a line indicating the first and last slice, which generates a user defined
amount of slices, or cross sections, describing the outer contour of the object.
The cut into slices tool lets you cut an object into parallel slices, perpendicular
to a line indicating the first and last slice, which generates a user defined
amount of slices, or cross sections, describing the outer contour of the object.
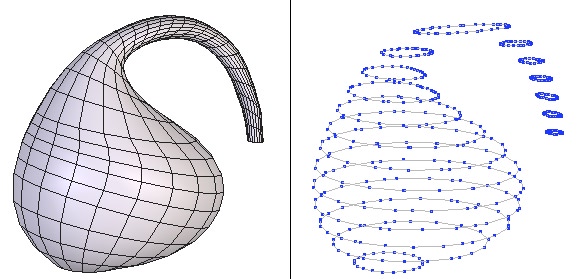
Left: the original object. Right: the object cut into slices.
Usage:
- Select an object to cut into slices.
- Select the cut into slices tool, in the Utilities Tab.
- Click to define the start, using the Shift key to snap to a point on the object, if needed.
- A manipulator appears as a red line.
- Move the mouse cursor, and the red line shows the connection between the first point and current position. Click to define the last point. You can also enter this information in the tool properties palette.
- Define the number of slices by using the +/- keys on the keypad, or in the tool properties palette, where you can also define the space between the slices.
- Validate the tool to finish the operation.
Remarks:
- This tool does not work on groups.
Keyboard shortcut: +/- (numbers keypad): increases or decreases the number of slices.
Hide
![]() The hide tool lets you make an object in the scene disappear temporarily.
The object is not deleted, but is hidden and is still present in the scene tree of the
Properties panel. You can unhide the object as needed.
The hide tool lets you make an object in the scene disappear temporarily.
The object is not deleted, but is hidden and is still present in the scene tree of the
Properties panel. You can unhide the object as needed.
Usage:
- With an existing selection:
- Select the object to hide, or make a multiple selection.
- Select the hide tool, in the Utilities tab, or on the hide icon next to the element in the scene tree.
- The object is automatically hidden.
- Without an existing selection:
- No object is selected in the scene.
- Select the hide tool, in the tools sub-palette
- Select the objects to be hidden. They now take on the color of a selection.
- Validate to hide the selected objects.
Options:
 Select all: selects all the objects in the scene and hides them.
Remarks:
- Hidden objects in a scene are not exported.
- A hidden object in a saved file is still there when the file is reopened.
- Visible objects are displayed in the scene tree preceded by the
 icon. This symbol is an active icon and allows you to mask the object without using the hide tool.
Keyboard shortcut: Ctrl/Command + Shift + H
Show
![]() The show tool unhides previous hidden objects.
The show tool unhides previous hidden objects.
Usage:
- Select the show tool, in the Utilities tab.
- Only the hidden objects in the scene are shown, and all the objects that are already visible are temporarily hidden.
- Clicking on the objects selects the objects to show.
- Validate the tool to show the selected objects, and return to the rest of the scene.
Options:
 Select all: selects all the hidden objects in the scene and shows them.
Remarks:
- Hidden objects are still in the scene tree, with the X symbol next to them. This symbol is also a button for showing (or hiding) the object without using the show tool.
Keyboard shortcut: Ctrl/Command + H
Group
![]() The group tool lets you temporarily associate several objects together, to
create one manipulatable element, or to simplify and organize a complex scene.
The group tool lets you temporarily associate several objects together, to
create one manipulatable element, or to simplify and organize a complex scene.
It is also possible to make groups of groups, for example make two groups into one group.
When creating a 3D model of a car it would be useful to create a group for the body, wheels, motor parts, etc., organizing your model in a logical fashion. You would also then be able to hide and show whole groups at a time.
Usage:
- Grouping multiple selected objects:
- Select the objects to group making a multiple selection.
- Select the group tool in the Utilities tab.
- The group is automatically created.
- Grouping objects one at a time:
- Less than two objects are selected.
- Select the group tool.
- Select the objects to be included in the group. They now take on the color of a selection.
- If needed, use the select all option in the tool properties palette, which validates the tool.
- Validate the tool to create the group.
Options:
 Select all: lets you select all the objects present in the scene and creates the group.
Remarks:
- The group tool is temporary, unlike the weld tool: the weld tool cannot be reversed (except with undo, or if you used dynamic geometry), but you can always ungroup.
- Selecting elements once the group tool is active is done by inverse mode, or clicking on a selected object deselects it, and clicking an unselected object selects it.
- The bounding box of a group is a wireframe cube containing all the group, and not the four corners as on a standard object.
Keyboard shortcut: Ctrl/Command + G
Ungroup
![]() The ungroup tool lets you break apart the individual elements of a group
association.
The ungroup tool lets you break apart the individual elements of a group
association.
Usage:
- Ungrouping a selected group:
- Select a group to ungroup.
- Select the ungroup tool in the tools sub-palette of the Utilities tab.
- The group is automatically ungrouped.
- Ungrouping with no selection:
- No group is selected.
- Select the ungroup tool, in the Utilities tab.
- Only the groups in the scene are shown, and all the objects that are ungrouped are temporarily hidden.
- Clicking on the groups selects the groups to ungroup.
- Validate the tool to ungroup the selected groups.
Remarks:
- In the first case, if there are no more groups in the scene, the tool is automatically validated.
- Since groups can be grouped into sub-groups, ungrouping an association of groups will only release those sub-groups, and not ungroup everything at once. Apply the ungroup tool as much as necessary to continue to ungroup the sub-elements.
Keyboard shortcut: Ctrl/Command + Shift + G
Orient Normals
![]() The orient normals tool lets you define the orientation, or the face’s front
and back, of a face or selection of facets. This orientation is very important,
because certain tools use the normal to make their calculations, such as the thickness
tool for example, and certain programs do not show or render the back sides of
polygons.
The orient normals tool lets you define the orientation, or the face’s front
and back, of a face or selection of facets. This orientation is very important,
because certain tools use the normal to make their calculations, such as the thickness
tool for example, and certain programs do not show or render the back sides of
polygons.
The front face of the polygon is symbolized as an arrow
Usage:
- Select the object to modify the normals.
- Select the orient normals tool in the Utilities tab.
- Click on the face that you want to change the orientation of the normal.
- Validate the tool to finish the operation.
Options:
 Select all: selects all the faces of an object, in order to unify the normals.
 Unify normals: lets you unify all the normals of an object in the same direction. Click on one of the faces to define the direction for all the normals.
Remarks:
- If parts of your object seem to be missing, verify that the backfaces are visible, by clicking on the icon show/hide backfaces in the control panel.
Keyboard shortcut: Space bar: lets you flip the normal of the selected face.
Decimate
![]() The decimate tool lets you simplify an object by deleting polygons while
conserving the global aspect of the object.
The decimate tool lets you simplify an object by deleting polygons while
conserving the global aspect of the object.

From left to right: the original object, with higher decimation values.
Usage:
- Select the object to simplify.
- Select the decimate tool in the Utilities tab.
- Define the amount of decimation by using the +/- keys on the keypad, or in the tool properties palette.
- Validate the tool to finish the operation.
Remarks:
- The tool simplifies by triangulation of the selected object.
- The amount of decimation from 0 and 1.0. That is 0.3 is equivalent to keeping 30% of the original object.
Keyboard shortcut: +/- (number keypad): increases or decreases the amount of decimation.
Extract the Openings
![]() The extract the openings tool functions like the close tool in the Vertex
Modeling tab, letting you select the openings on an object to close them, except this
tool creates the closures as a new object, unattached to the original.
The extract the openings tool functions like the close tool in the Vertex
Modeling tab, letting you select the openings on an object to close them, except this
tool creates the closures as a new object, unattached to the original.

From left to right: the object with its openings, the extracted openings, then moved.
Usage:
- Select an object with openings to be extracted.
- Select the extract the openings tool, in the Utilities tab.
- Click on the openings to extract, which are symbolized by a white contour around the edges. The selected openings turn red.
- Validate the tool to finish the operation.
Options:
 Select all: selects all openings on selected object.
Triangulate Non-Planar Facets
![]() The triangulate non planar facets tool lets you transform into triangles the
polygons of a selected object the points of which are not in the same plane.
The triangulate non planar facets tool lets you transform into triangles the
polygons of a selected object the points of which are not in the same plane.
Usage:
- Select an object where the polygons are non planar.
- Select the triangulate non planar facets tool, in the Utilities tab: the tool triangulates any non planar facets.
Triangulate N-Gons
![]() The triangulate n-gons tool lets you divide any polygon made up of more
than four points into triangles.
The triangulate n-gons tool lets you divide any polygon made up of more
than four points into triangles.
This tool is useful when exporting to certain programs that do not support an object made up of polygons that are not triangles or quadrangles.
Usage:
- Select an object where the polygons have more than four points.
- Select the triangulate n-gons tool, in the Utilities tab: the tool triangulates any polygons with more than four points.
Merge Duplicated Points
![]() The merge duplicate points tool lets you delete any points that might be
overlapping, or are one on top of another.
The merge duplicate points tool lets you delete any points that might be
overlapping, or are one on top of another.
This tool is useful when exporting to certain programs that do not support overlapping points.
Usage:
- Select an object where there are extra points to delete.
- Select the merge duplicate points tool in the Utilities tab: the tool deletes the extra points.
Merge Duplicated UVs
![]() The merge duplicated UVs tool enables you to remove UV coordinates
that could be duplicated, e.g. one on the other.
The merge duplicated UVs tool enables you to remove UV coordinates
that could be duplicated, e.g. one on the other.
Usage:
- Select the object for which you want to merge duplicated UVs.
- Take the merge duplicated UVs tool, located in the Utilities tab. The tool automatically removes redundant UV coordinates.
Merge Coplanar Facets
![]() The merge coplanar facets tool lets you combine any facets that share an
edge and are in the same plane.
The merge coplanar facets tool lets you combine any facets that share an
edge and are in the same plane.
Usage:
- Select an object where there are coplanar facets to merge.
- Select the merge coplanar facets tool, in the Utilities tab: the tool merges the extra facets
Remarks:
- Use this tool when the smooth tool produces unexpected results.