Table of Contents
Vertex Modeling
Introduction
The Vertex Modeling tab of the modeling panel contains tools for creating and editing polyhedric shapes in a freehand style, by starting off with basic 3D forms (Polygons or 3D Primitives).
Most tools in this section do not support dynamic geometry, no matter what DG mode is chosen.
Edge Tools
![]() The edge tool has three associated tools: Extract along, Extract around and
Extract fillet, which work only on the edges of objects. Since these tools are
very similar, being combined into one tool makes it easier to use.
The edge tool has three associated tools: Extract along, Extract around and
Extract fillet, which work only on the edges of objects. Since these tools are
very similar, being combined into one tool makes it easier to use.
A special manipulator appears on the selection, made of three elements, each corresponding to a function of the tool:
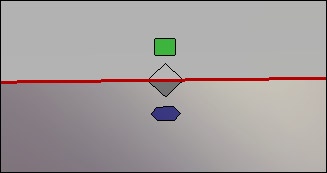
The edge tools special manipulators.
Each of these tools is also available individually in order to assign a keyboard shortcut to them.
Remarks:
- Using one of the “Edge tools” on a selection of polygons will convert it into a boundary, and will apply the operation on the selection which will have been converted into an edge selection.
- Edge tools work on a simple selection as well as on non-contiguous multi-selected edges.
Keyboard shortcut: E
Extract Around
![]() The extract around tool lets you create two edges parallel and around
the original edge, or edges, depending on the selection made before. The original
edge stays selected after the operation is finished.
The extract around tool lets you create two edges parallel and around
the original edge, or edges, depending on the selection made before. The original
edge stays selected after the operation is finished.
Usage:
- Select one or several edges of a surface or volume.
- Select the edge tool or extract around tool in the Vertex Modeling tab.
- Click and drag on the manipulator that appears on the selection, and move it to define the offset of the newly created edges. In the case of the extract around tool (and not the edge tool), it is also possible to click directly on the edge and not just on the manipulator to effect it.
- With the original edge still selected, it is now easy to manipulate it, for example, creating a raised button, or a pushed in zone.
Extract Along
![]() The extract along tool lets you extract a selected edge along the edges next
to it. This tool is useful for fine-tuning a model, for example adding a loop of edges
around an existing edge.
The extract along tool lets you extract a selected edge along the edges next
to it. This tool is useful for fine-tuning a model, for example adding a loop of edges
around an existing edge.
Usage:
- Select one or several edges on a surface or volume.
- Select the edge tool or extract along tool in the Vertex Modeling tab.
- Click and drag on the manipulator that appears on the selection, and move it to define the placement of the newly created edges. In the case of the extract along tool (and not the edge tool), it is also possible to click directly on the edge and not just on the manipulator to effect it.

From left to right: the edges selection, the extract along operation and the final result.
Keyboard shortcut: Shift+A
Fillet
![]() The extract fillet tool lets you extract a selected edge along the edges next
to it. The result is like the chamfer tool set to range 0.
The extract fillet tool lets you extract a selected edge along the edges next
to it. The result is like the chamfer tool set to range 0.

From left to right: the edges selection, the fillet operation and the final result.
Usage:
- Select one or several edges on a surface or volume.
- Select the edge tool or extract fillet tool in the Vertex Modeling tab.
- Click and drag on the manipulator that appears on the selection, and move it to define the spacing of the newly created edges, or the size of the fillet. In the case of the extract fillet tool (and not the edge tool), it is also possible to click directly on the edge and not just on the manipulator to affect it.
- The operation has only one step, so there is no need to validate it.
Keyboard shortcut: Ctrl+F
Fast Extrude
![]() The fast extrude tool lets you extrude faces or edges depending on your
selection.
The fast extrude tool lets you extrude faces or edges depending on your
selection.
The results differ according to the selection. If the selection is faces: a specific manipulator appears, made of three elements, permitting different operations:
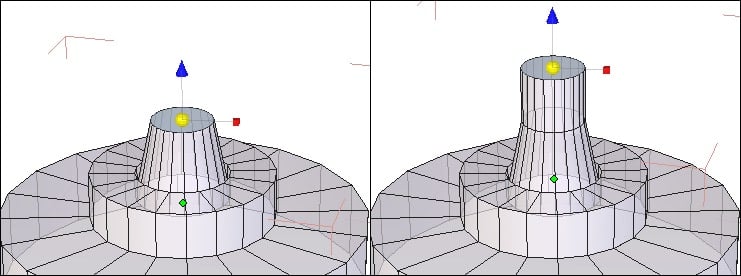
The manipulator on a face selection.
If the selection is made of edges shared by two polygons:
 Manipulator for making a vertical extrusion.
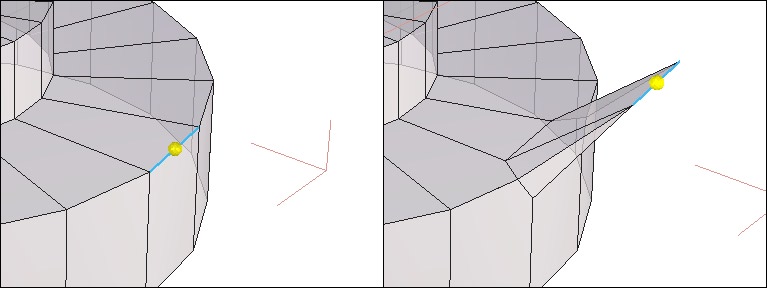
The manipulator on an edge selection.
If the selection is made of edges that are on the border of a face (the edges around a plane for example) the manipulator by default stays the same (move, rotate, scale or universal), but when the edge is moved, a new face is created from the selected edge.

From left to right: an extrusion on edges on a border of a face.
Usage:
- Select one or several edges or faces on a surface or volume.
- Select the fast extrude tool in the sub-palette of the Vertex Modeling tab.
- According to the extrusion desired, click-drag on the element of the manipulator to create the extrusion.
Remark:
- The extruded face or edge remains selected, making it easy to continue to fast extrude again, as many times as desired.
Keyboard shortcut: Ctrl (different extrusion possibilities exist depending on the selection).
Move Along
![]() This tool lets you move an edge along its adjacent face. It is a very useful
tool for fine-tuning, for example, moving an “edge loop” on an existing surface,
like around an eye.
This tool lets you move an edge along its adjacent face. It is a very useful
tool for fine-tuning, for example, moving an “edge loop” on an existing surface,
like around an eye.

From left to right: the initial edges, the move along operation and the final result.
Usage:
- Select one or several edges on an surface or a volume.
- Select the move along tool in the Vertex Modeling tab.
- Click-drag on the selection of edges, and move them to their new position.
Symmetry
![]() The symmetry tool lets you make a copy of an object, according to a
mirroring plane chosen either on the bounding box around the original object, or
an offset plane you can define. This tool has a clone option, letting the mirrored
object be a clone.
The symmetry tool lets you make a copy of an object, according to a
mirroring plane chosen either on the bounding box around the original object, or
an offset plane you can define. This tool has a clone option, letting the mirrored
object be a clone.
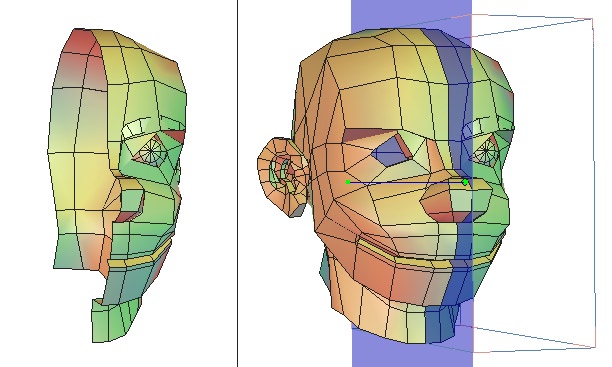
Left: the original object. Right: the mirrored object.
Usage:
- Select the object to be mirrored.
- Select the symmetry tool in the Vertex Modeling tab.
- A bounding box appears on the selected object. Moving your mouse over a face of this box highlights in blue the plane to be used for the mirror.
- Select the clone option if needed
- Click on the plane which you want to use, or choose in the tool properties palette the desired plane from the absolute axes (X, -X, Y, -Y, etc…).
- The mirrored object is created.
Options:
 Center of symmetry mode: lets you make a mirrored copy from a plane, offset from the object by a chosen distance. Use the space bar to choose another axis to offset your plane from.
 Clone: with this option, the copy you create will be updated along with the original.
Remark:
- If necessary, use the Shift key to snap the plane of symmetry to an existing object in the scene.
Keyboard shortcuts:
- Space bar: Lets you flip between available planes (X,Y, Z) in the case of using an offset plane.
- A right click lets you go from one symmetry option to another, either symmetry by bounding box, or center of symmetry mode
Tesselate
![]() The tesselate tool lets you add detail to the topology of an object by cutting
faces or adding edges where desired.
The tesselate tool lets you add detail to the topology of an object by cutting
faces or adding edges where desired.
Free Tesselate
![]() The free tesselation mode lets you cut a face by adding edges between
clicked points located either on edges or directly on the polygon surface. This tool
is very convenient when creating objects in “Box modeling” because it allows you
to draw new edges directly on a polygon.
The free tesselation mode lets you cut a face by adding edges between
clicked points located either on edges or directly on the polygon surface. This tool
is very convenient when creating objects in “Box modeling” because it allows you
to draw new edges directly on a polygon.

From left to right, the tesselation in action.
Usage:
- Select the object to be edited.
- Select the tesselate tool in the Vertex Modeling tab under the free tesselation menu.
- Click on an edge or intersection of edges, to define the start of the cut.
- Click inside one of the polygons adjacent to the edge, or on any edge. The new edges are automatically created.
- Double click to validate the tool and start again elsewhere if necessary.
- Validate to finish the operation.
Remarks:
- There are several limitations to the tesselation of a polygon:
- The tesselation process must start and end on an edge. It cannot start in the middle of a polygon.
- Avoid creating crossing edges over a polygon, even if it's technically possible, it may generate degenerate surfaces.
Tesselate by Segment
![]() The tesselation by segment mode (by default) lets you “cut” a face by
adding edges between clicked points on the object.
The tesselation by segment mode (by default) lets you “cut” a face by
adding edges between clicked points on the object.

From left to right, the tesselation in action.
Usage:
- Select the object to be edited.
- Select the tesselate tool in the Vertex Modeling tab.
- Click on an edge or intersection of edges, to define the start of the cut.
- Click on another edge of your choice, and the new edge or edges will be created automatically. It is not necessary to click on all the edges through the cut, the tool will automatically cut through any edges between the two clicked places.
- Double click on an edge to validate the tool and start again elsewhere if necessary.
- Validate to finish the operation.
Add a Single Vertex on an Edge of a Polygon
![]() This “Tesselation” allows you to add a vertex on an edge of an existing polygon
to transform, for example a triangle into a quadrangle.
This “Tesselation” allows you to add a vertex on an edge of an existing polygon
to transform, for example a triangle into a quadrangle.
Usage:
- Select the object to edit.
- Take the “Tesselation” tool, in the “Vertex Modeling” tab.
- Click on the edge on which you want to add a vertex, and then validate to end the operation.
Remark:
- Using this tool will not immediately change the visual aspect of the object. To visualize the added vertex, turn to vertex selection mode to edit it afterwards, if necessary.
Tesselate by Slice
![]() The tesselation by slice mode will slice the object perpendicular to the edge
at the place clicked on that edge. If the topology permits, the slice will go around
the object.
The tesselation by slice mode will slice the object perpendicular to the edge
at the place clicked on that edge. If the topology permits, the slice will go around
the object.

From left to right: the original object and the starting edge, the slice and the slice once selected.
Usage:
- Select the object to be edited.
- Select the tesselate tool in the Vertex Modeling tab, then the tesselation by slice option in the tool options palette.
- Click on an edge or intersection of edges, to define the start of the cut.
- The tool automatically creates the slice.
- Create as many slices as needed, then validate the tool.
Remark:
- It is not always obvious what the results will be, because it depends entirely on the topology the slice encounters, especially across intersections of a face with more than four sides.
Automatic Tesselation
![]()
![]()
![]() The three “automatic tesselation” tools enable you to subdivide the selected
faces into respectively a rectangle, a triangle or a rhombus.
The three “automatic tesselation” tools enable you to subdivide the selected
faces into respectively a rectangle, a triangle or a rhombus.
These tools allow you to locally refine the geometry to work on it with more accuracy.

On the left, selected polygons. On the right, the same polygons with an automatic tesselation applied.
Usage:
- Select the object to edit.
- In faces selection mode, select one or several polygons to subdivide.
- Click on the automatic tesselation tool of your choice in the Vertex Modeling palette: “quad tesselation”, “triangular tesselation” or “diamond tesselation”. The faces you selected are automatically subdivided according to the type of tesselation you chose.
Connect
![]() The connect tool creates edges according to a selection made before, either
vertices or edges (but not faces).
The connect tool creates edges according to a selection made before, either
vertices or edges (but not faces).
In the case of a selection of edges parallel to each other (like a “ring” selection), the tesselation is made perpendicular to and at the middle of each edge.
In the case of two points on the same polygon, the tesselation is made between these two points.
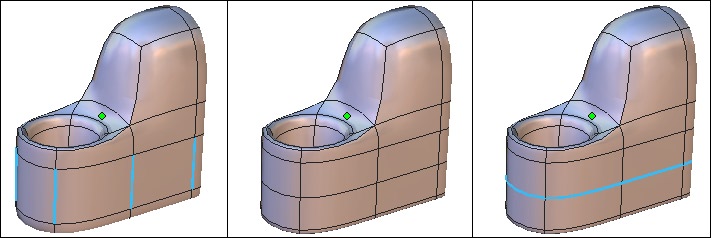
From left to right: selected edges, the tesselation and the resulting selection.
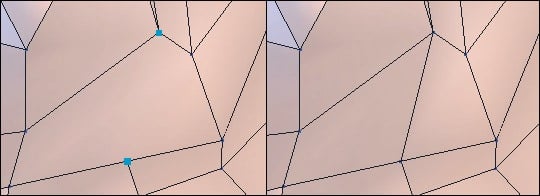
Left: selected points. Right: the final tesselation.
Usage:
- Select a series of edges parallel to one another, or two points on the same polygon.
- Select the tesselate tool in the sub-palette of the Vertex Modeling tab.
- The tesselation is automatic.
Remark:
- The connect tool works on two points on the same polygon, and not on a series of points.
Smooth More/Less
![]()
![]() The smooth more/less tools lets you define the quality of the object, whether
they are lines or polygon objects.
The smooth more/less tools lets you define the quality of the object, whether
they are lines or polygon objects.
These tools are like the smoothing tool in the surface modeling tab, except only the default smoothing of Catmull-Clark/surface subdivision is applied, with no options of other types offered.
The tool lets you rapidly go from “high to low” resolution and back again, preferably while using the keyboard shortcuts.
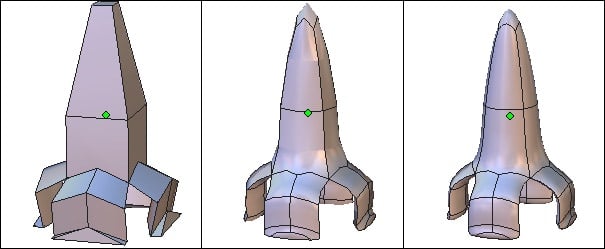
From left to right: The object with no smoothing, then, a range 1 smoothing and, the range 2 smoothing.
Usage:
- Select the object of which you want to affect the smoothing.
- Select the increase smoothing tool or the decrease smoothing tool in the Vertex Modeling tab or by clicking on the range level in the object property panel.
Remarks:
- The smoothing is always dynamic, and shows up on the dynamic geometry tree.
- All smoothing options (type, range, etc.) are available by clicking on the “edit dynamic smoothing” icon in the object properties palette while the object is selected.
- The smoothing can be increased five times, or range 7.
Keyboard shortcuts:
- Page Up: increases smoothing.
- Page Down: decreases smoothing. At 0 smoothing, the tool is no longer present on the object.
Close
![]() The close tool will close openings on the selected object.
The close tool will close openings on the selected object.
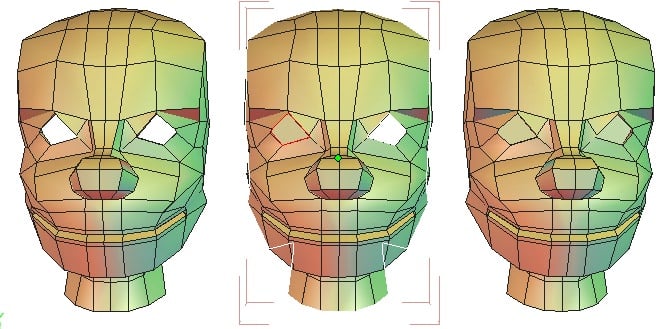
From left to right: the objects with its openings, the object being closed and the final.
Usage:
- Select the object of which you would like to close the openings.
- Select the close tool in the Vertex Modeling tab.
- White contours appear around the openings: clicking on the contours will turn them red, showing that on validation, that opening will be closed.
- Click again on a red contour will turn it white, and it will be unaffected.
- Validate the tool to finish the operation.
Options:
 Select all: lets you close all openings in one step. Note that this option also validates the tool, and you cannot choose to deselect an opening.
Remark:
- This tool only applies to surfaces with an opening surrounded by polygonal objects, like the case of an open cylinder.
Weld Objects
![]() The weld objects tool lets you join several objects together permanently, in
order to have one object. Not to be confused with the group tool which is only a
temporary association of objects. This tool is also located in the Surface Modeling
tab.
The weld objects tool lets you join several objects together permanently, in
order to have one object. Not to be confused with the group tool which is only a
temporary association of objects. This tool is also located in the Surface Modeling
tab.
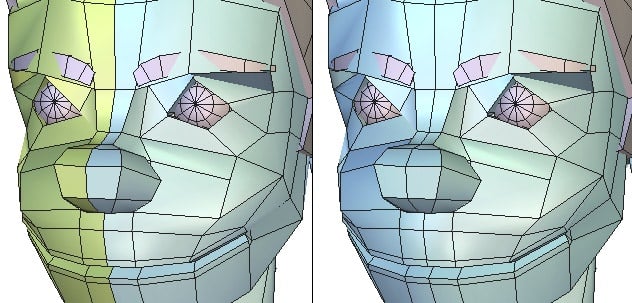
Left: the two independent objects. Right: the two objects welded together.
Usage:
- Welding a selected group of objects:
- Select all the objects to be welded.
- Select the weld objects tool, in the Vertex Modeling tab.
- Welding objects selected one at a time:
- Select an object.
- Select the weld objects tool.
- Now select the other objects to be joined. The selections are made in inverse mode: clicking on a selected object deselects it, and clicking an unselected object selects it.
- Validate the tool to finish the operation.
Options:
 Select all: takes all the objects in the scene and welds them together.
 Keep the dynamic geometry: welds the objects together, while keeping the ability to edit further their DG tree.
Remarks:
- Once several objects are welded, the only operation that can take off the weld is undo, unless you use the keep the dynamic geometry option.
- This function works also between curves and between surfaces, but you cannot weld a curve to a surface.
Weld Points
![]() The weld points tool lets you weld selected points.
The weld points tool lets you weld selected points.
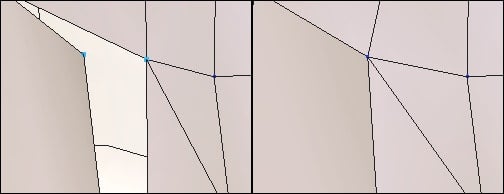
Left: the surfaces with unwelded points. Right: the merged points.
Usage:
- Select the weld points tool, in the Vertex Modeling tab.
- Select the points one at a time and see the resulting welding in real-time, or use a lasso selection to go quicker.
- Validate to finish with the tool.
Remarks:
- The selection, after welding, remains active until the tool is validated. Click again on a point to remove it from the weld operation.
- For better productivity, choose to select points with the lasso: a selection of other elements other than the active selection deselects the active selection and makes a new selection. This avoids having to manually deselect the previous weld if several welds are necessary.
Average Weld
![]() The average weld tool lets you define a zone of influence, or distance, on a
selection of points. If within the selection there are points within the distance, they
will be welded together.
The average weld tool lets you define a zone of influence, or distance, on a
selection of points. If within the selection there are points within the distance, they
will be welded together.
This tool is very useful after a symmetry operation, where you want to weld the two parts together. In many cases, the points around a symmetry plane are not aligned, and it is necessary to weld them one at a time. With this tool, you only need to select the whole area of the plane of symmetry and to input a low value for the zone of influence, so that only the very close points are welded.
Usage:
- Select the average weld tool, in the Vertex Modeling tab.
- Select the points to weld.
- In the tool properties palette, input a distance value. The higher the number, the more the vertices will be welded together. The preview is updated in real time.
- Validate to finish with the tool.
Target Weld
![]() The target weld tool lets you weld a vertex or edge to another of the same
type.
The target weld tool lets you weld a vertex or edge to another of the same
type.

From left to right: the edge to be welded. The target selection and the final result.
Usage:
- Select a vertex or an edge on a surface or a volume.
- Select the target weld tool in the Vertex Modeling tab.
- Select the target entity to be welded to: the selection moves and is welded to the target selection.
Remarks:
- Target weld is not possible with multiple selections.
- Target weld is not possible in the case where the result produces an edge shared by more than two polygons.
Keyboard shortcut: W
Sweep Surface & Extrude Surface
![]()
![]() The sweep surface and extrude surface tools, in the vertex modeling tab,
let you sweep (or tube) and extrude faces, edges and vertices, either previously
selected, or once the tool is active.
The sweep surface and extrude surface tools, in the vertex modeling tab,
let you sweep (or tube) and extrude faces, edges and vertices, either previously
selected, or once the tool is active.
These tools let you easily make complex shapes, starting from simple ones. The tools function the same way, only the results change depending on the options used. They are used with the technique often called “box modeling”.
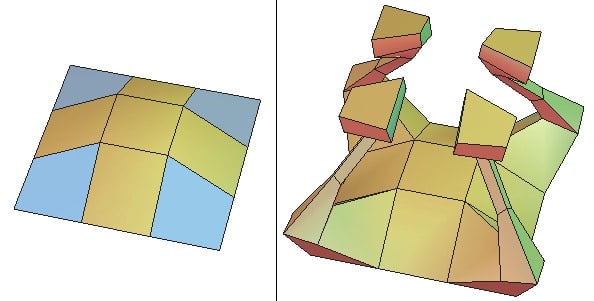
Left: the original object with selected polygons. Right: the result of the sweep.
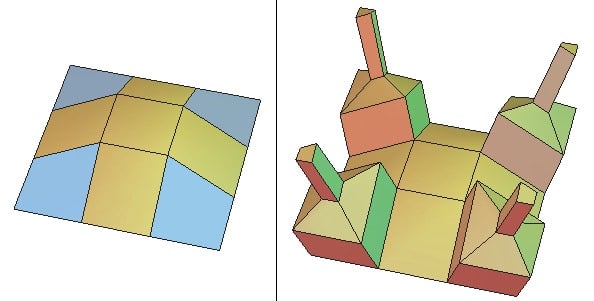
Left: the original object with selected polygons. Right: the result of the extrusion.
Usage:
- Select the desired element to work with before or after the tool is selected.
- Select the sweep surface or extrude surface tool in the Vertex Modeling tab: the selection is automatically swept or extruded.
- Several methods of sweeping and extruding are possible, by changing the defaults of the tools:
 Extrusion: The movement of your cursor defines the height and width of the current section from the preceding one.
 Sweep: The movement of your cursor defines the height and angle of the current section from the preceding one.
 Axial: The movement of your cursor defines the height of the current section from the preceding one, and keeps the same angle (creating an extension).
 Radial: The movement of your cursor defines the width of the current section from the preceding one, keeping it at the same height (creating an inset).
- Click to create as many new sections as necessary.
- In the tool properties palette, enter in exact numbers for the height and width of each section.
- Validate to place the last section and finish the operation.
Options:
 Block On/Off: lets you join or not the polygons that are next to each other while sweeping or extruding.

Left: the original object with selected polygons. At the center, the result of the block on option. Right: the result of the block off option.
 Clone On/Off: lets you clone or not an extrusion or profile when several extrusions are made at the same time of selections that are not adjacent. Available only in full dynamic geometry mode.
Tweak
![]() The tweak tool can quickly modify geometry of an object by moving its
structure. The goal of this tool is to visually refine the aspect of an object, like a
sculptor refines his sculpture.
The tweak tool can quickly modify geometry of an object by moving its
structure. The goal of this tool is to visually refine the aspect of an object, like a
sculptor refines his sculpture.
This tool always moves its entities according to the camera plane (parallel to the screen).
Usage:
- Select the tweak tool in the Vertex Modeling tab.
- If the selection mode was select object, the mode changes to select auto.
- Using click-drags with the mouse, move vertices, edges or faces.
- Validate the tool to finish the operation.
Remark:
- The tool only works on the entity closest to the mouse cursor, and it is possible to change the selection while tweaking without leaving the tool:
- Shift + Drag mouse: add items to the selection like in paint mode.
- Shift+ Click: adds (toggles) item to the current selection.
- Double-click on the object to reset the selection, or switch to another object (see select auto mode).
- Extend selection such as in the manipulator mode.
Extract
![]() The extract tool lets you separate a selection of faces from an object, to
obtain a new object from the selected one.
The extract tool lets you separate a selection of faces from an object, to
obtain a new object from the selected one.

From left to right: the selected polygons, the extracted faces and the extracted faces moved.
Usage:
- Select faces on an object.
- Select the extract tool in the Vertex Modeling tab: the selection is automatically converted into a new object, and subtracted from the selected object.
Remark:
- This tool does not function on edges and vertices.
Bridge
![]() The “Bridge” tool builds a connecting surface between two selections. This
tool is very useful to create surfaces joining two existing parts of an object, for
example to connect the extremity of the handle of a vase onto its base.
The “Bridge” tool builds a connecting surface between two selections. This
tool is very useful to create surfaces joining two existing parts of an object, for
example to connect the extremity of the handle of a vase onto its base.
If faces are selected, they will be removed and a surface will be created between the two holes. If the object is smoothed, the bridge operation is performed on the control shape and the result is automatically smoothed. If both selections belong to different objects, the bridge is created and both objects are automatically welded together into a single object.
Usage:
- Do a faces or edges multi-selection on an object. Note: To create a bridge with the bridge tool, you need to make two disjointed selections: the bridge tool will have no effect if two adjacent polygons are selected.
- Take the bridge tool, located in the “Vertex Modeling” Tab: the bridge surface, connecting both selections together, is created.
- Adjust the different options if necessary.
Options:
- Twist: Performs a rotation of the bridge surface between both selections.
- Invert: Inverts the bridge surface orientation
- Num slices: Adds cross-sections, perpendicular to the connecting surface, allowing you to refine the bridge mesh, in order to add further details to it.
Remarks:
- The bridge tool does not work when the symmetry mode is activated on the selected object.
- To select faces on distinct objects, select first both objects (Shift+click for the multi-selection), then switch to face selection mode and click on faces, which will serve as bases for the bridge, while holding the Shift key.
Dissociate
![]() The “Dissociate” tool disjoins the object structure around an edge, a vertex
or a face. This splits, for example, two faces that share an edge and allows you to
“open” a geometry, such as to insert an eye in a face, and so on.
The “Dissociate” tool disjoins the object structure around an edge, a vertex
or a face. This splits, for example, two faces that share an edge and allows you to
“open” a geometry, such as to insert an eye in a face, and so on.
Usage:
- Select vertices, edges or faces of an object.
- In the Vertex Modeling tab, select the “Dissociate” tool. The selected entities are automatically disjoined.
Remarks:
- In case of edge selection, it is necessary to select two adjacent edges to be able to dissociate the surrounding topology.
- The dissociate tool does not change the visual aspect of the edited object. You will see the result of the dissociate tool once you will move parts of the dissociated geometry, to visualize the created openings.
- When you dissociate a face, it is detached from the topology but still belongs to the selected object. A new object is not created.