Sidebar
Downloading With Install Manager (WIP)
This page is a WIP. There are likely to be incomplete and or missing steps while the page is being built.
Summary
Install Manager is designed to make downloading and installing content purchased from the DAZ 3D store, simple and easy.
Install Manager provides the ability to work in either an online or offline mode. While working in the online mode, Install Manager presents you with a list of available downloads and/or updates for your account. It allows you to selectively download all of the items in the list, specific items in the list or each item individually. You also have the option of automatically installing items in the list after it has finished downloading. This document will walk you through all the options so you can decide how best to fit them into your content management pipeline.
Process Overview
- What is Covered:
- Logging into the Correct Account
- Viewing and Downloading Your Files
- Filtering Files
Foundation
In order to download content from your DAZ 3D store account, you must have Install Manager installed and have your account associated, as well as your download location mapped. If you need help with either of these, please check the User Guide. The Install Manager has a great deal of advanced options as well. We will cover the basics here. To get more in-depth usage, please see the Reference Guide.
Step By Step
Step 1 - Logging In
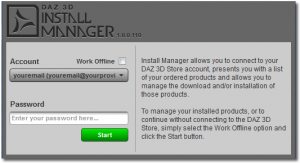
When working offline, the list on the Ready to Download Page is empty - the application must connect to the DAZ 3D store to retrieve the list of available downloads for an account. When working online, this page provides you with a list of all products and/or updates that are ready for download, for the account that you are currently signed in to.
- Open Install Manager and choose your account from the drop-down selection.
- Uncheck the “Work Offline” box
- Enter your password
- Click “Start”
Install Manager will now open to the “Ready to Download” pane. Once it has retrieved a list of products waiting to be downloaded, you will have several options.
Step 2 - Viewing and Downloading Your Files
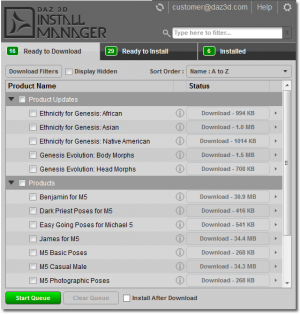
 This image shows you a “Ready to Download” screen populated with the files waiting in our account.
You are able to see the Product Name and can tell immediately if the file is new and waiting for Download, or if it is an Update as seen with “Ethnicity” and “Evolution” morphs in our example.
If you are logged in, and have no files listed, this means you have nothing new to download. If you are sure you have new files, make sure you are logged in to the correct account, and that you are not “Working Offline”. Also make sure you are showing any files you may have hidden. The “Display Hidden” box should be checked if you have hidden files and wish to see them.
There are several advanced options for viewing and managing files in the Right-click context menus. Please refer to the Reference Guide for more information on these features.
You now have the following choices:
- Download All Files - Check the “Product Updates” or “Products” boxes and all your files will be selected under each header. Click “Start Queue”.
- Download Selected Files - This is the same, but instead, individually select the files you want to download. This is good if you run multiple programs and want to download to separate locations. Again, click the “Start Queue” once you have made your choices.
- Download One File at a Time - To download a single file in the list, you can click the “Download” button to the right of the file you want to download.
- Install after Download - If this check box is ticked, anything you download will install immediately after download. The files will install to the location you have set in “Settings”, so if you have multiple locations, make sure you have the correct one selected before choosing this option.
- View the Product Documentation - You can view a product's online documentation at any time by clicking the “i” to the far right of the Product Name.
- Clear Queue - You can clear your selections at any time by clicking the Clear Queue button.
Checking the “Install After Download” box will do exactly that. As soon as the Zip is downloaded it will install to the currently selected location. This goes on even if you are still downloading other files. If you want to install files to different locations, make sure to Uncheck this box!
Step 3 - Sorting & Filtering Files
Sorting
You can quickly sort your files by “A to Z” or by several other options. The “Sort Order” drop-down contains the following selections:
- Name: A to Z - Sorts the list by descending alphabetical order.
- Name: Z to A - Sorts the list by ascending alphabetical order.
- Product ID: Highest First - Highest ID, in descending order.
- Product ID: Highest First - Lowest ID, in ascending order.
- Download Size: Largest First - Largest Zip size, in descending order.
- Download Size: Smallest First - Smallest Zip size, in ascending order.
- Download Date: Recent First - Newest downloaded, in descending order.
- Download Date: Oldest First - Oldest downloaded, in ascending order.
- Order Date: Recent First - Newest purchases, in descending order.
- Order Date: Oldest First - Oldest purchases, in ascending order.
- Status: Busy First - Active Zips in Queue, in descending order.
- Status: Idle First - Idle Zips in Queue, in ascending order.
- Selection: Selected First - Selected Zips in Queue in descending order.
- Selection: Non-Selected First - Non-Selected Zips in Queue in ascending order.
Filtering
Filtering in Install Manager is very easy, but also has very advanced filtering modifiers available. We will cover the basic keyword filtering below. Please refer to the Reference Guide section on Advanced Filtering for more ways to view the products you want to see, and how you want to see them.
If you want to filter your file view to show only specific files, you can type your chosen keyword in the “Filter Field” as shown in the left-hand image below. We used 'Genesis'. Only products with the keyword 'Genesis' in the name, are showing. You can also use phrases. If you know all or part of a product name, type it in and the filter will show any products with that particular 'phrase'.
The nice thing about this feature is that is keeps your checked selections as you change filter words. Here, we are going to check the selection boxes for 'Genesis'.
In the right-hand image below, we left our “Genesis” filtered products checked, and then filtered by 'Victoria' and checked these products as well. When we return to our full list of products, you can see both filtered selections we made remain checked. The “Genesis” products remained checked, even when we ran a new filter and added the other product for “Victoria”.
The filtering feature works across all the status windows. By this, we mean if we have 1 product with “Genesis” in its name already “Installed”, and 6 waiting in “Ready to Install”, we will see all 7 products. You can see this in our “Genesis” example here. We installed the Gorilla product from our previous filtering exercise. You can now see we only have 6 left in Ready To Install, and 1 is now listed in Installed.
You can do the same thing using the SKU number to find a particular product. Just put the number, for example, sku::12356 (or a range of numbers sku::12350-14350) in the Filter Field. Please see: Advanced Filtering for more advanced filtering options.
Wrap-Up
This is all that is required for accessing and retrieving files from your account. Installing files is very similar. When you are ready, please read Installing With Install Manager (WIP) for more help and information.
If you need further help with installing or setting up Install Manager, please start here:
If you would like more in-depth information, please read:


