Table of Contents
DAZ Studio 4.x
- QuickStart Guide PDF
- User Guide PDF
This is an old revision of the document!
This page is a WIP. There are likely to be incomplete and or missing steps while the page is being built.
This article is dependent on functionality that is not available until v4.5.x is released. Information relating to the current build status is available on the DAZ Studio v4.x page.
In this tutorial we will cover how to create and adjust JCMs or Joint Controlled Morph. This article is the first in a five-part series.
In this tutorial, we will create a Joint Controlled Morph, or JCM, to correct joint rotation issue with a Shoulder Bend. We will be using a custom Goblin Model for our example. The Shoulder Bend, set at -35, flattened out the deltoid on our Goblin. An attempt was made to adjust the bulge values to compensate, which grew the deltoid, but unfortunately it also left it with a wedge shape. Neither was acceptable, so a JCM morph will need to be created. (See Illus. 1)
First, pick the Shoulder Bend parameter Control and set it at its limit of -35. This will be the base we will use to make the corrective morph. Make sure that the new character morph Goblin is applied to its full strength of 100 percent.
There are some settings that need to be taken care of before the model is exported. Start by making sure Genesis is selected, then switch to the Parameters Pane. Next, click on General and select Mesh Resolution. Set the Resolution Level to Base, and the Subdivision Level to 0. (See Illus. 2).
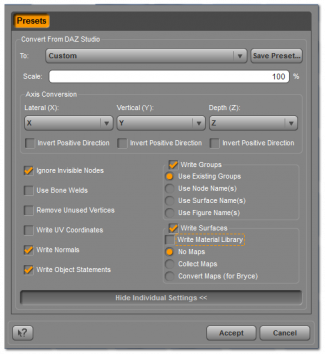
 Now it is ready to be exported out of DAZ Studio, and to be imported and modified in your modeling program.. Be sure to choose .obj as the type. It is also best to export out using DAZ Studio Scale. The export settings pictured here are sufficient for exporting out a morph. (See Illus. 3)
Note: When naming the Joint Controlled Morph, use distinctive naming for the JCM by adding the character name, to differentiate the new character morph from other morphs loaded on Genesis. The Goblin used the name JCMdrGoblinRShldrBndUp. Breaking this down: JCM (type of corrective) dr (artist initials) Goblin (Name of character) R (designating right or left bodypart) Shldr (the name of the joint) BndUp (the type of movement and direction of movement) This makes it clear in the property editor what the control does, and what character it belongs to.
Adding the artist initials may seem like overkill, but if someone else should release a goblin character that happens to have a JCM named the same, it could cause problems with loading the wrong JCM for the character.
In your modeler, make the morph to correct the joint issue in the shoulder. When the morph is completed, make sure that the new character in DAZ Studio is still in its original position. Ensure the R Shoulder is bend at -35, and the Goblin morph is applied to 100 percent. Basically, what is in the scene should match what was exported out.
Load the new JCM onto the character using DAZ Studio's Morph Loader Pro. (See Illus. 4) In the options choose Reverse Deformations, R-click on the default “no” and change it to yes. The other default options are fine. (See Illus. 5)
The new JCM by default loads under Morphs/Morph Loader. Set the limits of the control by clicking the small gear on the parameter control. (See Illus. 6) Choose Parameter Settings and a dialog box will open. Change the Min Limit to 0. The JCM only works from 0 to 100 percent. Select Accept.
One thing to keep in mind, leaving limits on in negative values will cause problems when the shoulder joint is bent in the opposite direction. It's best to get in the habit of changing the limits at the onset.
Scroll on the JCM, (make sure the arm is still bend at -35, and that the new character morph Goblin is still on) See how the new corrective rounds out the deltoid. (See Illus. 7)
Check the morph and make sure it is not moving any other part of the model. If so, there is a good chance that the model is not in its original exported out position. Reposition Genesis to match up the exact original exported pose, also check to make sure you have not applied any other morphs or adjustments from your original. Import in the morph again using the above steps, and see if that takes care of the issue.
Now the new JCM has to be hooked up to the rotation of the R Shoulder. For this example it will be done manually through Property Editor.
First, think about how this new JCM needs to operate.
Criteria for JCM:
Now that it is determined what the control must do, open up Property Editor. (See Illus. 8) Notice that Property Editor is divided into 2 sections. The Left contains Grouping/Settings, and the Right side contains the Hierarchy.
On the left side, locate the new JCM that was created for the character. It should be found under the Morphs, Morph Loader Pro... section. If it is not there, click on the Menu and use the Refresh Pane option to bring it up.
For completing criteria 1, look on the right side of Property Editor and locate the new character morph Goblin. This is where the first link will be made. By clicking on the triangular shaped tab before Goblin, you can open up more properties associated with it. Drag the new JCM morph from the left side and to the right under the Goblin. Drop it directly onto Sub-Components. (See Illus. 9) When it appears under Sub-Components, select it. Down at the bottom of the Hierarchy side there is a box called Link Attributes change the ERC Type to Multiply. (See Illus. 10)
Criteria 2. Must work with the Shoulder Bend Control in Negative values only. Locate the Right Shoulder properties on the right side under Hierarchy, and open up the tree underneath it. Search for Z Rotate (Bend). Again, locate the new JCM from the Left side of the pane, and drag it onto Sub-components found under the R Shoulder/ Z Rotate (Bend). It will then appear under Sub-Components. (See Illus. 11)
Note that under Link Attributes the default ERC Type is Delta Add. This is the correct setting for this link. Do not change it. Remember that we set the limits for the JCM earlier so it works only from 0 to 100 percent. This prevents the JCM from turning on when the shoulder is bent in the positive direction.
For criteria 3, the morph needs to apply gradually, and reach its full value at -35. Here comes the fun part. Math! Under link attributes, you will find a Scalar Value. For this morph, we need to change it from the default setting l.
 To get the correct value, divide 1 (1 = full strength) by 35 (35 = the limit of the shoulder bend up.) The resulting answer is 0.0285714285714286.
DAZ Studio only needs 6 numbers past the decimal point, so we can delete most of this and simplify to 0.028571. The shoulder bend up is in the negative, so a negative sign needs to be added to our value, giving us -.028571. This is the final value that is put in the Scalar Value box.
You will note that when this 6 digit value is entered, DAZ Studio appears to round it up, but it is still using this 6 digit number. Not going back at least 6 digits past the decimal point may introduce errors and the morph may not apply to the correct strength when it reaches -35.
Criteria 3 has just been fulfilled, and these links must now be tested. Close Property Editor.
To test the JCM, Zero out the figure and the new character morph. Bend up the shoulder to -35, and scroll on the new character control. Check to see if the JCM Control is reading 100% strength. Bend the R Shoulder down to half at -17.5. The JCM morph should read 50%. Return the R Shoulder to -35. Remove the Goblin morph completely. The JCM should also reset to 0.
These same steps are the completed for the L Shoulder JCM.
NOTE: The workflow for all of the joints on a figure are the same for any areas needing a JCM.
In this final step we will do some clean up as well as finalize the location of the JCM. All of this can be done in the Parameter Settings. Refer to Step 3 if you need help getting back to Parameter Settings.
JCMs are only meant to correct joint issues. They should never need to be applied by the end user. For this reason, it is best to hide the control and place its location in a hidden category, to make it clear to the end user that it is a morph that should only work in the background.
In Parameter Settings, check the Hidden box. (See Illus. 12)
It has been an internal DAZ 3D standard to use display as Value. With the Parameter Settings still open, make sure As Percent is un-checked. (See Illus. 12)
Next, if you desire, the color of the control display can be changed. The color in this case, is a DAZ 3D standard, indicating to the user that this control should not be used. Change the gradient top/left to a red color. Internally DAZ 3D uses 127,0,0 for the Gradient Top Left, and 41,41,41 for the Gradient Bottom Right. (See Illus. 13)
While here, set the content Type. Click on the arrow, next to the Type text box, and choose Modifier/Corrective from the menu.
The last item on the list is moving the control from Morphs/MorphLoader to a different location. Once again, click on the arrow, this time next to the Path text box. A large list opens up showing all the current groupings available in Genesis. In this case, the exact one we want is not yet created, so choose the closest, Hidden/JCMs. In the text box, add /Goblin. (See Illus. 14)
You can also type it in manually, but by choosing the closest path first, you are more likely to avoid typing errors.
 You are now done editing your JCM. Choose Accept to close the Parameter Settings.
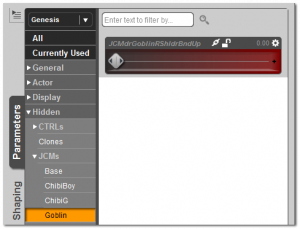
The new JCM is now hidden and has been moved to its new location. In Parameters (as well as Property Editor) it can be found under Hidden > JCMs > Goblin. The color scheme matches the DAZ 3D production standard for Hidden Controls. (See Illus. 15)
This finalizes the JCM creation.
At this point, any work you have done will be lost if you close DAZ Studio or start a new scene. You must save your MCM. If you need to learn how to save morphs, please refer to the Saving Morphs (WIP) 2014 article. Here you will learn the different saving options available and select the one that best fits your workflow.
This completes the first tutorial in our series. When you are ready, continue on to the rest of the Advanced Character Creation series, linked below.