Table of Contents
DAZ Studio 4.x
- QuickStart Guide PDF
- User Guide PDF
This page is a WIP. There are likely to be incomplete and or missing steps while the page is being built.
It is highly recommended that clothing be modeled to fit the default Genesis base figure. It will save the clothing creator many steps down the road.
However, if it is difficult for the clothing creator to visualize what the clothing will look like on a specific morph shape, it is possible to start with a piece of clothing, modeled to a specific morph, in a modeling program. It can then be adjusted to fit the base Genesis shape.
For this tutorial, the Aiko morph shape is used.
Make sure the Genesis base shape is in its default position. Dial the desired morph shape to model against. In this case Aiko is dialed to its full strength of 1.0.
Export the Aiko 4 Morph Shape for use as a modeling reference to create the clothing item. Make sure that the scaling of the morph shape is set to 100 percent before exporting. (Not doing so will cause issues with the clothing not fitting the morph shape when it is dialed.)
If you are working on a slower computer, it will be useful to export the un-subdivided version of the morph shape to model against. To do this go to the Parameters Pane > Tab Options > set Resolution Level to Base, and set the subdivision level to 1. (See Illus. 1)
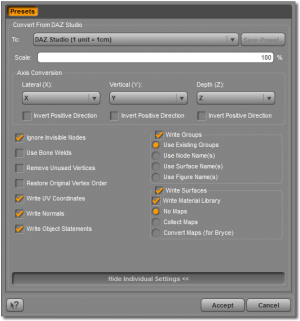 Go to File > Export. Export the Aiko morph shape as an .obj file. If possible, use DAZ Studio scale. A dialog box will open up with several options available. (See Illus. 2) These options will be sufficient.
Use your preferred modeling program to create the clothing around the Aiko shape.
Import the finished clothing item that was modeled around the Aiko Shape. Go to File > Import, and navigate to the clothing obj. These settings will be sufficient for importing the clothing item. (See Illus. 3)
Dial on the Aiko Morph Shape on Genesis. Check the fit of the clothing item in DAZ Studio. There should be no display artifacts or signs of the model poking through the clothing.
Open up the Transfer Utility. (Right click on the Scene Tab > Assets > Transfer Utility. (See Illus.4) The Source Scene Item should read Genesis. The Target Scene Item should read Aiko Outfit. (Or your imported obj name.)
The Item Shape is the morph shape that was modeled against, (in this case Aiko 4) After Source Item Shape, change default to morph. (See Illus. 5) A list will open up of all the available morph shapes for Genesis. Choose Aiko 4. Make sure it is the FBM Aiko 4, do not use the Aiko 4 Clone Shape or you will get unexpected and less than optimal results.
The Target Item Shape should read default.
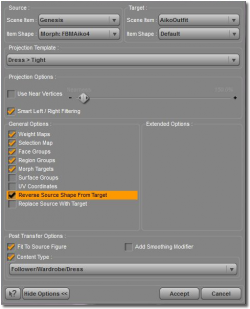 The use of a projection template is optional. In this case the dress - tight template was used. Open up the Advanced Options. These items should be checked off. Content type is set to Follower/Wardrobe/Dress. (See Illus. 6) Choose Accept.
Note that the Add Smoothing Modifier is not checked at this time. This will be added as a final step after the weight maps are adjusted. It is not a good idea to rely on the smoothing modifier to take care of weight map issues. Your clothing will work faster and play better with different morph shapes if time is taken to adjust the weight maps of the clothing item.
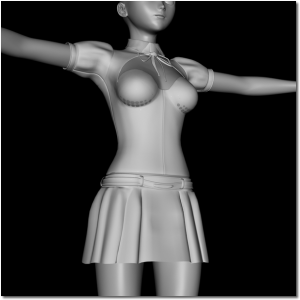 Once the transfer utility has been run on the clothing, that the mesh has changed - there is poke through under the breast area and the mesh at the front of the skirt warped a bit. (See Illus. 7) The original shape of the clothing item is preferred. This bad version can be replaced by using Morph Loader Pro at a later step.
Dial off the Aiko 4 morph while the clothing is still conformed. What you are left with is the Genesis default base, with the clothing morphing to the base shape.
Note that the clothing on the base shape is not optimal. It needs to be cleaned up in a modeling program. (See Illus. 8,9,10)
Export out the clothing item that is now fitting Genesis. It was saved as BaseOutfit. Make fixes in a modeling program to the clothing so it fits nicely on the Genesis Base. (See Illus. 11)
 The BaseOutfit.obj is the starting point for creating the clothing. Go to File > Import, and navigate to the new Baseoutfit.obj that has just been optimized for the Genesis Base shape. These settings will be sufficient for importing in the clothing item. (See Illus. 3)
Check the fit of the clothing item on Genesis in DAZ Studio. There should be no display artifacts or signs of the Genesis model poking through the clothing.
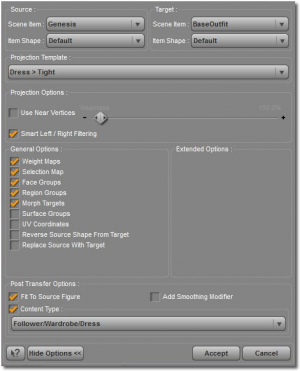
Open up the Transfer Utility. (Right click on the Scene Pane > Assets > Transfer Utility. (See Illus. 4) The source scene Item should read Genesis. The Target Scene Item Should read Base Outfit.
The use of a projection template is optional. In this case the dress - tight template was used. Open up the Advanced Options. These items should be checked off. (See Illus. 12) Content type is set to Follower/Wardrobe/Dress. Choose Accept. (Again, Note that the Add Smoothing Modifier is not checked at this time. This will be added as a final step after the weight maps are adjusted).
If you are using this method for clothing creation, there is no doubt a great deal of work has been placed into that special fit for the morph shape that it was created for. Its recommended to replace the auto-generated Aiko clothing morph, with the Optimized one that was started with at the beginning of this tutorial.
![]() Make sure the Clothing Item is selected in the scene tab. Open Morph Loader Pro. (See Illus. 13) Navigate to the finished clothing item and select it. The item name should read FBMAiko4 (Internal name of the morph shape), and change Overwrite Existing to Deltas Only. (See Illus. 14) Now the original Aiko Clothing Shape is as it was originally modeled. See (Illus. 15)
Make sure the Clothing Item is selected in the scene tab. Open Morph Loader Pro. (See Illus. 13) Navigate to the finished clothing item and select it. The item name should read FBMAiko4 (Internal name of the morph shape), and change Overwrite Existing to Deltas Only. (See Illus. 14) Now the original Aiko Clothing Shape is as it was originally modeled. See (Illus. 15)
Check all the joint bending on the clothing item. All weight map adjustments and testing need to be done on the Genesis Base Figure,(Not the Aiko Morph Shape) make sure the smoothing is NOT on. For this example, I did not use a projection template for the outfit to demonstrate what needs weight map adjustments. (See Illus. 16)
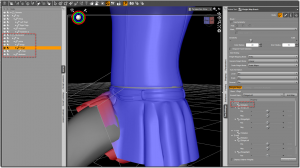 Go into the weight Map Tool. Make sure the Tool Settings pane is open. Select the Right Thigh of the Skirt. This is the X Rotation of the Thigh. Under X Axis, select the X Rotation, to make visible the current weight map on the thigh. (See Illus. 17)
Bend the Right Thigh up to give a good view of the distortion. By using the smoothing brush and the weight map brush, adjust the area until it is satisfactory. Using Wire Framed Mode will give a clear view to what needs to be adjusted. Here is an image of the adjusted weight map. (See Illus. 18) Please be aware that there is no smoothing modifier placed on the clothing to achieve this result. It's all done with the weight tools.
By starting out with clean weight maps before the smoothing modifier is applied, the clothing will play better with other morph shapes, look better with posing, and will be able to use smaller smoothing iteration values when the smoothing modifier is applied. This will speed things up for the end user as well.
It recommended to keep the smoothing modifier off when testing your clothing on the base genesis shapes. It will be easier to see problem areas on morphs shapes if this is done. Export any shapes that need adjusting into the modeling program and replace them as outlined above with the Aiko Clothing Morph. Remember to keep the scale of exported items at 100 percent, so they will work when reloaded.
The smoothing modifier has the benefit of smoothing out the clothing mesh and also uses collision to help prevent poke through. This will help take care of those tiny mesh problems that may not warrant a visit back to the modeler. It will help ensure the clothing works better with future character shapes that have not yet been released.
While smoothing has many benefits, it can cause the user to experience slowdown. Try to save the clothing with the least amount of smoothing iterations necessary and still make the clothing work nicely. ALWAYS save with the Interactive Update in the OFF position for the clothing item. This being set to ON can greatly slow down users system. Leave that choice up to the end user.
To apply the smoothing modifier - Right click on the Scene Pane > Edit > Apply Smoothing Modifier. (See Illus. 19)
Now save the clothing item. Go to File > Save As > Support Asset > DUF Figure or Prop File.
This technique can be used for any shape or custom morph.
Return to Creating Content