User Tools

Site Tools


Creating "The Temple" Image (WIP)

This page is a WIP. There are likely to be incomplete and or missing steps while the page is being built.

Summary

This is an overview of how Lantios (one of our customers) has created this image of “The Temple”. How the scene was set up, the figure shaped, the lighting, poses and the clothing positioned on Genesis.

Process Overview

  • Load the Jannah structure (background environment and structure).
  • Load Genesis figure and dial up Victoria 5 shape.
  • Apply Bree Elite texture.
  • Position and pose the figure.
  • Use autoFit to apply generation 4 clothing, hair and jewelry onto V5 (Genesis).
  • Add background characters, shape, pose and cloth each figure.
  • Setting up the camera, depth of field settings and add lighting.

Foundation

  • Genesis - is the base figure used in DAZ Studio 4. This figure can be shapped/morphed into a wide variety of male or female, large or small shapes.
  • Texture - the image projected onto the skin of the figure. Can include color, make-up, subtile changes in skin finishes.
  • Pose - Position the figure into a desired stance or position.
  • AutoFit - A tool avialable in DAZ Studio 4 Advanced, allowing clothing from earlier generation figures (V4 for example) to be applied and fit properly to the Genesis figure shapes.
  • UV's - when a texture is flattened to position the proper surface color/textures that space is called U and V.
  • Smoothing - Is a tool used to make changes to how the clothing is draped on the figure. See the video under content.
  • DOF - Depth of Field is a setting to allow the final rendering to have areas of total focus and areas to be blurred or out of focus.
  • Poke through - Is an area of the figure where the clothing is not positioned properly over the shape. There are tools like smoothing and collision detection that can help to fix this issue.

Step By Step

Step 1

MAIN FOCUS – The main focus of the render is Victoria 5.

  • I actually started the scene by loading Jack Tomalin’s Jannah, the temple structure she’s in and began scouting for an angle for where to put her. I already had a good idea where I was going with the render, so after I found my angle, I went ahead and loaded Genesis and dialed up “Victoria 5” and “Victoria 5 Supermodel”. I loaded her Elite texture “Bree” and started looking for a pose. I tried several dozen before I found the right one with what I had in mind and after that I started moving and rotating Victoria to see if everything fit to my liking. Once that was done, I proceeded to clothing her.

  • Using Auto-Fit, a tool DAZ developed, which fits clothing from previous generations over to Genesis, I started trying different dresses on Victoria. Auto-Fit isn’t great at fitting over dresses; it replaces the rigging that allows most of them to function the way they do. However for this scene it doesn’t really matter – it doesn’t show and when and where it does, it will be easily fixed once we bring the render over in Photoshop later. So after I Auto-Fit the Evening Star Dress for V4 over to Victoria 5 and load a different texture map on it, I go ahead and load an armlet as well using the same tool.
  • Last but not least, we can’t leave her bald. I went in the Genesis folder and loaded her some hair and then fiddled around with the shader settings until I was happy with them.

Step 2

BACKGROUND – Let’s talk about the background characters now.

  • There are two of them and they’re both Victoria 5, albeit with slightly altered faces as well as different skin textures. Let’s start with the black-haired one. I loaded her up the same way I did the first Vicky in but instead of loading Elite Bree, I loaded Elite Amy, which is a skin texture that was made a long time ago for Victoria 4.

  • One of the amazing things about Genesis is that not only does it accept clothes from all of Generation 4, but it also accepts the UVs from that same generation. So I didn’t have to wait for DAZ or someone to come up with another high quality texture, I could just use the ones I already had!
  • After that was done, I loaded another dress, which it too didn’t Auto-Fit perfectly but well enough that I can get away with it with only minor poke-through, which is easily fixed later on in the process.

  • Then, I also used Auto-Fit to fit over some hair for her, hair that was made for Victoria 4. The refitting went over great so I stuck with it and I copied over the shader settings from the main V5’s hair so I don’t waste any time.
  • The process for the third Vicky was essentially the same, except the hair was made for her and I used Elite Lana, another texture made for Victoria 4, so that they don’t look identical.

Step 3

FOREGROUND – For added effect, I also added Michael 4 to the foreground and loaded up a beefy morph on him.

  • I then added the bracers and the skirt from a clothing set and used the “smoothing modifier” to the bracer. It’s a new feature in DS4 that adds collision detection and is great for fitting clothing over a morph they don’t support (in older generations) and creating great effects like a hand squeezing a ball where there is actual squeezing without having to take the ball into a modeling app.

Step 4

DETAILS – Among other things I added Depth of Field (DOF) to the camera which focuses on the main Victoria and blurs out the rest, as that is what I intended from the beginning.
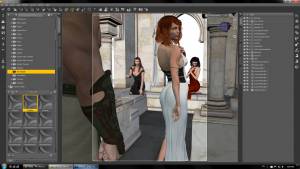
  • For the lighting, I hand painted a map for UberEnvironment2, which is a 3Delight light shader that adds, among other things, Ambient Occlusion and Image Based Lighting to DAZ Studio. In this case it is set to Directional Shadows with AO and I applied the map I had done in Photoshop.
  • I loaded up two distant lights to the scene. One going from the right and one going from the left and both set to light blue to brighten up the scene from the dark blue/purple that UberEnvironment2 provided and set them to 40% and 45% intensity respectively.
  • I then added 6 point lights to the 6 lamps the temple has (they are off-camera) and set those to a light pink to give off light as if they were lit up.

Step 5

POSTWORK – In postwork I kept it simple, actually;

  • I fixed any poke-through I found, I removed the top of the right column in the right corner since it looked out of place and I did some standard color correction and applied curves to really make the image pop.
  • I also painted a background after sampling colors from several photos of how the sky looks at dusk as that’s the time of day I’m going for with the lighting.
  • I also added a tear falling down her right cheek to accentuate the whole image as well as adding some reflections and highlighting to make her eyes stand out more.

Products and Tools Used

Wrap-Up