Sidebar
Using Measure Metrics
Summary
This section will cover how to use the basic Measure Metrics plugin features. Be sure to check the Advanced Measuring section when you are done to find out how to further utilize this plugin.
Processes
This section covers the following topics:
Getting Started - The Measure Metrics Pane
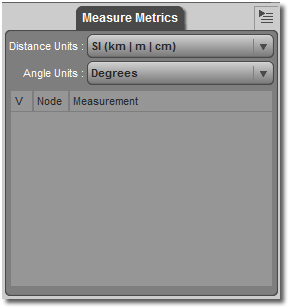
The Measure Metrics pane allows you to view real time measurements, in real world units. Before going any further, the pane should be open and within view. Without it, you will not be able to change the unit of measure, or see the detailed, real time results. Let's go ahead and open the pane now.
- Navigate to “Window > Panes (Tabs)”
- Select “Measure Metrics”
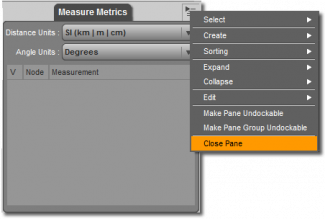
You should see a free floating Pane (Tab) Group with a single pane in it, labeled “Measure Metrics”. This Pane (Tab) can be docked or left un-docked. Leave it un-docked for the moment. (Use the Pane Options Menu, in the top right corner, to see additional options.)
 Under the “Distance Units:”, you can choose from any of the following:
- SI (km|m|cm)
- US (mi|ft|in)
- Meters (m)
- Centimeters (cm)
- Yards (yd)
- Feet (ft)
- Inches (in)
The “Angle Units:” lets you choose from the following, for when you are using the Protractor:
- Degrees
- Radians
- Mils
- Grads
The Pane (Tab) Option Menu provides you with several selection, sorting and other actions for working and managing multiple measure nodes within the scene. Many of the options in this menu are also available in the context (right-click) menu for the list.
Set each of these to your preferred unit of measure - don't worry, you can change these settings at will later, without adverse affect. Now, go ahead and load a figure into your scene. Start with an un-textured Genesis 2 Female (included with DAZ studio) and her simple undergarments.
Using the Plugin Nodes
The Measure Metrics plugin provides four types of new nodes which are used to “measure” different aspects of your figure or object. By being “nodes”, you can use several tools within DAZ Studio on them and have the same effects and results as with any other node. In other words, you can use the Universal, Translate, Rotate, and Scale tools, the Align pane, as well as actions like Move to Floor and they will work the same way they do on your figures and objects. You can parent these nodes to your figures or to a “Null” or choose to target an object itself.
Let's cover this in more detail…
Measuring Node Basics
There are some attributes common to all three measuring nodes. The basics will be covered first and then get into the individual specifics for each node type further down.
Create the Node:
 You need to measure the height of Genesis 2 Female. Select the Genesis figure. Now, you can choose one of two ways to create the Measure Metrics Node. The first (in the opened Measure Metrics pane), is to click the Menu in the top right corner of the pane group and select “New Measure Metric”.
The other way is to go to the Main Menu Bar and select:
- “Create > New Measure Metric”
Either method will give you the same dialog. Let's select “Tape Measure”.
Options:
As you can see, you have some choices to make.
- “Name” - When naming your node, try to use a name that will remind you what it is doing or is linked to, so you can quickly identify it later.
- “Apply Default Settings” - This drops the node into the scene at “zero”. It will not be parented to any item and will have no “target” set.
- “Parent to Selected Item” - This will parent the measuring node to the selected node of the figure or object. For example, you can select a door hidden somewhere in the back of your scene. The node will parent to the door and you can take your measurements for height, distance etc… The parented node will also move with the item it is parented to, making it easier to move things around without resetting the measuring node each time.
- “Target Selected Item” - This is the item which is being measured and from which the results will be displayed. Selecting this option with your item selected, will automatically pick that item as the target.
- “Create a Persistent Point At (Null)” - If you check this box, it will create a “Null” for the measuring node to use as a target in which to point to and follow. This is useful when you want to measure from a specific spot, to somewhere else. An example would be using the Tape Measure to measure from the hand to the floor. You can “parent” the Tape Measure node to the hand, and measure to various locations from that point, by moving the null to the desired locations. (i.e. hand to floor, hand to collar, hand to elbow…)
Important: If you do not have anything in the scene selected, all options will be grayed out except “Default”. Go back and select the desired item, and then create the new measuring node.
Using the Tape Measure
This node works the same way a typical retractable measuring tape would. It measures in a single straight line, from point “A” to point “B”.
 Make sure you have Genesis selected and let's create a new Measure Metric. Select “Tape Measure” and “Parent to Selected Item”. Give it the Name “Height” so you know what this node is doing. There will be a small red “Tape Measure” avatar parented to genesis, like the image below.
If you select Genesis and move the figure around the viewport, the Tape Measure will follow right along.
Select the Tape Measure and move it….
Wait….nothing happened! The measurement stayed at 0.00 cm. Ctrl+Z (Cmd+Z on a Mac) to undo your move.
You need to tell the Tape Measure what to “Target”. Make sure the Tape Measure is selected and open the “Parameters” pane, as shown.
If you select “Measure”, you will see two options show up on the right:
Warning: Measurement - is the raw measurement data in centimeters. You do not want to make changes to this dial - ever. Thus, it is “locked”. If you decide to play with it and unlock it, you will not get accurate readings. It should be used as a quick visual reading only.
Let's look at the option: Measure Target.
- Click the Measure Target button and select Genesis 2 Female from the list in the pop-up window.
- Click “Accept”
 The Tape Measure now has the settings it needs to give you data. If you move the Tape Measure, you should see the measurement values change in the Measure Metrics pane. Try dragging the tape up on the “Y” axis. If you stop with the bottom of the tape measure avatar level to the top of the figures head as shown in the image, you can see
Genesis is 1m 79.40cm tall.
Notice the bottom of the tape stays tacked to the center point of Genesis. This is where you “parented” the Tape Measure earlier. It will always measure from this point, no matter which direction you drag the tape avatar.
Compare it to using a real life retractable tape measure. This is the same concept. Keep in mind, unlike a real tape measure, it measures “as the bird flies”. You can measure through objects and do not have to move furniture out of the way to measure the distance between two points.
Tip: Change the “Distance Units” to “mi/ft/in” and you will see the data convert in real time. You do not need to remeasure or recreate a new node. The best part of all… you do do not need to remember mathematical conversion formulas as you frantically hunt for a pencil and paper!
Now to try something different.
- Delete the current Tape Measure if you still have one in the scene.
- Select Genesis's Left Hand.
- Create a New Measure Metrics Tape Measure, but this time, choose:
- “Parent to Selected Item”
- Check the “Create a Persistent Point At (Null)” box
- Give it an appropriate name – Distance From Hand might work here.
This will create your new tape measure, and at the same time, parent it to the hand. It will also be set to target a null which has been added to the scene. (This null will be invisible.)
Move the tape measure avatar to the top of the left wrist and bend the forearm about -50 degrees. The tape measure avatar will follow since you parented it to the hand. Next, select the “Tape Measure Target” in your scene and move it to the elbow as shown in this image.
 As you can see, the null is centered on the elbow bend, and the measurement is approximately 8.95 inches, depending on your exact placement.
Drag the null to different parts of the figure and watch the measurements change. Also notice, the avatar stays positioned on the spot it was parented.
This will allow you to make several measurements from a single location, without re-positioning the Tape Measure each time.
There are many uses for the Tape Measure. Play and experiment to see what suits you best.
Using the Tailor Tape
This node allows you to take measurements the same way a clothing tailor would. Between the Tape Measure node and the Tailor Tape node, you can measure inseams, waist and hip sizes, and use it to set up accurate proportions for your figures.
Go ahead and create the Tailor Tape node. This time you have slightly different options.
- “Name” - When naming your node, try to use a name that will remind you what it is doing or is linked to, so you can quickly identify it later.
- “Apply Default Settings” - This drops the node into the scene at “zero”. It will not be parented to any item and will have no “target” set.
- “Parent to and target Selected Item” - This will parent the measuring node to the selected node of the figure or object. In the same step, it also Targets your selected item.
- “Target Selected Item” - This is the item which is being measured and from which the results will be displayed. Selecting this option with your item selected, will automatically pick that item as the target.
You do not have the option to create a Null with this node. Go ahead and select “Parent to and Target Selected Item” and give it the Name “Waist”, then click “Accept”.
You should see a square plane on the floor. Make sure “Tailor Tape” is selected in your scene, and drag it upward on the “Y” axis, to the waist area, as shown below.
TIP: If your figure moves instead of the node, make sure to check that it is in fact the Tailor Tape you have selected instead of Genesis. The center will look the same when you first load the Tailor Tape.
As you move the Tailor Tape up and down, you should see several dots around the circumference of the figure. These are the points where it is taking its measurements. There is one point on each “edge” of each poly, and a line between each point. (This is useful to know later in the Tips and Tricks below.)
As you move the Tailor Tape up and down, notice the real time changes in the Measure Metrics pane.
“Now wait a minute… If you drag the node over the clothing, the measurements are going to get all messed up!”
No, they will not. The beauty of the nodes are that they only read the mesh of the “target”. You can have several layers of clothing, and still measure the figure beneath. And if you want to see the measurement based on the clothing, you can do that too.
- Select the “Tailor Tape”
- Open the Parameter Pane
- Select “Measure”
- Under “Measure Target” select your clothing item (You may need to expand the figure tree if the item is nested.)
If you left the Tailor Tape at the waist, the measurement should have switched to “0”, as you are no longer measuring the Genesis figure. Move the node so it sits over your clothing item like so:
You should notice two things:
- The blue points now show up only when over your clothing item
- You now have a measurement over the clothing, but “0” over all other areas
This is because it is now measuring the targeted clothing item instead of the figure underneath.
“Ha! I have you now! I just want to measure a wrist or a single thigh and this tool won't do that!”
 Yes it will! Remember earlier you saw that the plugin is made of nodes so that you can use the DAZ Studio tools? Simply rotate the node on the “Z Rotate” axis, or use the “Scale” as we have done here. You can also see that we have multiple Tailor Tapes loaded in the scene and the Measure Metrics pane gives us separate measurements for each.
You can use the tools to move un-parented nodes anywhere in your scene. Rotate, Translate, Drop to Floor, Scale in any combination you need to get the results you desire.
You can add one or more nodes at a time, in any combination; two Tape Measures, a Tape Measure and a Protractor. Whatever you need.
(More techniques and combined measuring results will be covered in the “Advanced” sections below.)
Next, you will learn to use the Protractor node. Go ahead and delete any leftover nodes from the previous sections.
Using the Protractor
The “Protractor” node works on the same principle of the little plastic protractors you used in school. You line the protractor up on your item, and use the degree marks to figure out the angles. How many times have kids sat in Geometry class and thought “I'll never use this stuff…” Surprise!
 The best way to use the Protractor node is to use the “Target + Null” method. This allows you to drag the null around and use it as your straight edge to line up your angle measurement. Let's set up the scene.
You can sit Genesis on a cube that is the same height as an average kitchen chair. Add a Cube Primitive to your scene. Leave it at the “zeroed” location and do not move or rotate it.
Use what you have learned above in the Tape Measure section, and scale your cube to 20“ (50.80 cm) in height.
When you finish, you should have something that looks like this image.
Hint: Do not parent the Tape Measure to the Cube, as you will need to scale the cube and you do not want the node affected as well.
You do not need the Tape Measure after this point, so you can delete it. Now you can create the Protractor. Make sure nothing is selected in your scene, and use the following settings:
- “Name” your node
- “Protractor”
- “Apply Default Setting”
- Check “Create Persistent Point At (Null)”
This dropped the Protractor at “zero” in the scene. Do not target anything at this time, and you want to use the Null to set the 45 degree angle.
You can not see the Protractor node since our cube is also at zero. Go ahead and “hide” the cube. Use the little ”eye“ icon next to the Cube in your scene tree.
You will notice the guide line is coming out at a 45 degree angle, (See your Measure Metrics pane data), but it is not flush with the ground and is not going to help us rotate the cube in the direction you want. You will fix that now.
- Select your Protractor (not the Protractor Target)
- Rotate it -90 degrees on the “X Rotate” dial
The data in the Measure Metrics pane has changes. It now reads 90 degrees and the Protractor is laying flush on the ground plane. This is much more useful for what you need to do.

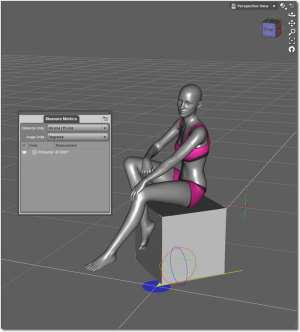
Select the “Protractor Target” and slide it along the “Z Translate” axis until your Measure Metrics plane reads “Protractor 45.0000”. (Hint: you can also type in -50.00 into the same dial in Parameters.)
 You can see the guide line is at a 45 degree angle, so un-hide the cube, and rotate it to match. Pose Genesis and move her to the cube. She has been standing for awhile now and deserves the rest…
Yes, you could have done this the easy way and changed the cube's “Y rotation” by -/+ 45 and gotten the exact same result, but you will not always be working with a cube that comes into your scene at a perfect 90 degrees to your camera. You could use the same process to position any item in the scene.
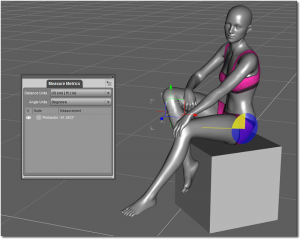
Try parenting the protractor to a body part and use the null in the same way you just learned to figure out the angle of a joint bend, or anything else you may want to measure. It can be either set to a Target, like you learned in the sections above, or you can measure several angles from a set point.
 In this last example, you measured the angle of Genesis's thigh bend after first, parenting the Protractor to the Hip, and then using the Protractor Target to set the end location of the measurement.
You can use the same Translate and Rotate tools you used earlier to position the Protractor exactly where you need it . Go ahead and experiment. Try parenting the Protractor and moving it with your figures in your scene.
The next section will cover some of the more advanced uses of this versatile plugin.
Wrap-Up
For further help, please refer to the main section of the plugin's documentation:
Or continue on to:


