Table of Contents
DAZ Studio 4.x
- QuickStart Guide PDF
- User Guide PDF
The following tutorial is a basic overview for modeling characters for Genesis and creating basic rigging on the figure.
Genesis™ is a new line of 3D figures designed to provide more versatility and customization than any single 3D figure ever created. Genesis consists of a common base figure from which a huge range of other 3D figures can be derived. All Genesis figures utilize the same core rig and 3D mesh of the base Genesis figure that they are built from.
This tutorial outlines how to create a new character for Genesis and how to adjust the rigging of Genesis to work for a new character.
This tutorial assumes you are using DAZ Studio 4.0.3.47 Pro or newer. We are also referencing 3rd party modeling software for portions of this article.
The Genesis base mesh has 18,872 polygons, but when it loads into DAZ Studio, it does so as a subdivided figure. Keep this in mind when modeling a character for Genesis. When exporting out the base Genesis mesh to start a new character, its important to export correctly.
Make sure the Genesis figure has all the morphs turned off and all the joint parameters are set to zero. From the Main Menu Bar, select Edit > Figure > Zero > Zero Figure. It should also be at it's zero position in the scene space. In the Parameters Tab, select Tab options. Change the Resolution Level to Base, and set the subdivision level to 1. (See Illus. 1)
From The Main Menu Bar, select File > Export... Export out the Genesis Base as an .obj file. If possible, use DAZ Studio scale. A dialog box will open up with several options available. (See Illus. 2) These options will be sufficient for making a new character morph for Genesis. Save the obj in a safe place.
There are some things to keep in mind when creating a new character for Genesis. While modeling, try to maintain the edge-looping that defines the different body parts. As an example, keep the shoulder a shoulder, and keep the elbow on Genesis a elbow for the character. Let's say a few edge-loops from the elbow area were borrowed and dragged down the forearm area to create a new ridge or bulge. The weight mapping will also be affected on the character when it is loaded back onto Genesis. When the new characters elbow is bent, it would very likely warp or have other issues that would need correcting.
The joints on Genesis can be modified to help offset this effect, but it is limited to moving the center points of the joints. Changing the weight maps across different characters is not an option at this time.
Keeping the character's size relative to the size of Genesis is also a good idea. It helps with clothing projection, making it more accurate and it is also easier making separate head and body morphs for new characters to work on Genesis.
If the character is meant to be much smaller or taller than the current Genesis height, scaling can be added in DAZ Studio to bring the character to the desired size. (The default child shape on Genesis was modeled at Genesis height and the scaled down in Studio to 54 percent. The scaling was linked to the child morph dial).
A note on navels and nipples - Genesis characters tend to have the navel and nipples smoothed out when the model is finalized. The reason for this is to have the character play well with clothing projection. Separate navel and nipple dials can be provided for your character, which can be set in studio to not project into clothing. Also, avoid pinching edge-loops very close together to create detail. This will make the character less likely to blend well with other morphs and characters. One can still create extreme character shapes with these restrictions. The DAZ Gorilla and the Anubis character are examples of pushing the limits of the Genesis mesh. (see illus. 3)
There is also the option of creating joint corrective morphs to help fix problems caused by extreme character shapes, which will be covered later.
After the character is complete, it can be loaded onto Genesis inside DAZ Studio 4 using Morph Loader Pro... Select on the Morph Loader Pro Icon, (see Illus. 4) this will open up an option box. Select Choose Morph Files. Import in at DAZ Studio Scale (If that is what the Genesis Base Mesh was exported at). The default settings are fine to use for now. It will place the new character morph into Morphs/Morphloader (under Parameters Pane) by default. (see Illus. 5)
For this tutorial a Goblin character was sculpted inside the modeling software, Modo. (See Illus. 6) It has a humanoid shape, but its proportions and the feet, hands and neck area are going to be areas to watch out for for rigging. The eyes are in a different location, along with the teeth and tongue.
When putting a few test poses on this figure with the default Genesis Rig, one can see the problem areas in the hands. The hands are quite a big larger in this character and Genesis's joints no longer fit the new character, which is causing the warping of the fingers. (See Illus. 7)
DAZ Studio 4 Pro has a tool that will make changing the rig of the Base Genesis figure, into a much easier process. The next steps will involve rigging the new character using the Genesis Rig.
Open up the Joint Editor and the Tool Settings tab. (see illus. 8) In the tool settings make sure that in the Display box the visible bones option is set to Entire Figure for now. (See Illus. 9)
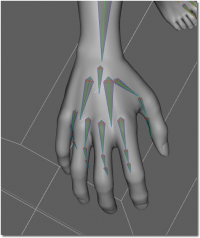 Taking a look at the character's hand - it is obvious that the bones no longer fit, which explains why the fingers are getting all warped. (See illus. 10)
To fix this issue, Select on Tab Options in Tool Settings, Select Edit and Adjust Rigging for Shape. (See Illus. 11) 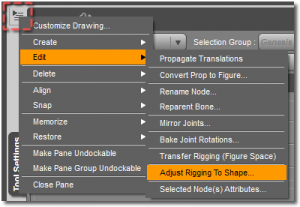 This will open the option box. The user has the option to check just the areas of the character that have changed. The Goblin character is a full body morph and the default settings will be sufficient. If the Goblin character consisted of just a head morph only, it is possible to limit the rigging changes to just the head area, by un-checking the areas that are not needed.
Select Accept to apply the rigging changes. (See Illus. 12) The Genesis Rig now changes to fit the new character. (See Illus. 13) This tool does a very good job of putting the joint centers where they need to be, but the joints still need to be tested and possibly tweaked a bit to work the best that they can.
Before the character is saved after applying adjust rigging for shape, the new rig position must be linked to the new character morph. If this step is overlooked, all rigging changes are lost.
 In the Scene Pane, make sure the Genesis figure is selected. Open Property Editor (See Illus. 14) Select on Tab Options and choose ERC Freeze... (See Illus. 15)
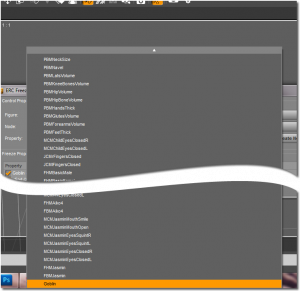
After Figure: select Genesis, after Node: select Genesis, and after Property you will find X Tran as the default. Select this and it will open up a long list of all the properties available on the Genesis figure. (See Illus. 16) At the bottom of the list, the new character morph Goblin is found.
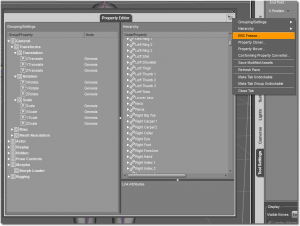
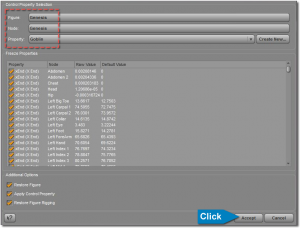
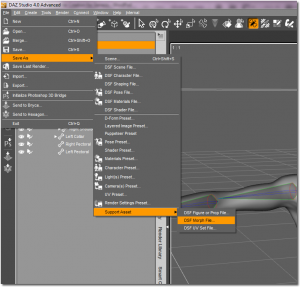
Select Goblin and it will fill the property box. (See Illus. 17) Once you select Accept, close the Property Editor and test the goblin morph dial while the bones are still visible. As the dial is adjusted, the bones should follow along with the morph. Save the file out as a DSF morph file. (See Illus. 18)
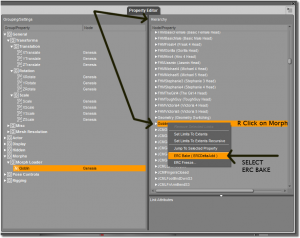 The new character still needs to be tested. Each joint must be tested at each dial's limits, on all three rotations. If you find a joint that needs adjustment, it cannot be adjusted until the ERC links are turned off for the new character's morph dial. That is accomplished by opening up Property Editor. Look over to the right side under the Hierarchy column. Scroll through the list and search for the new character morph Goblin. Select it and Right Mouse Click to open up an Option Dialog box, and Select ERC Bake. (See Illus. 19)
 Since all the new joint positions were frozen to the new character dial, the connections must be removed to make adjustments to the current rig for the new character. Once this is done, you can move any center point on the rig freely.
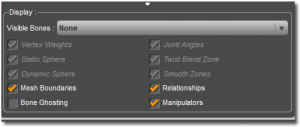
While testing this character, the Shin bend wasn't satisfactory. The Joint Editor and Tool Setting Tabs are opened up. It is useful to change the display options of the bones when manipulating the center points. (See Illus. 20)
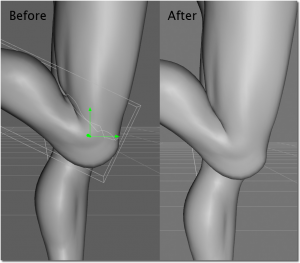 Visible Bones are set to None, leaving just the center and end points of the bone visible. You can manipulate the center point (which is the pivot of the bone) by selecting and dragging on the arrow shaped manipulator. In this case the center point was moved slightly on the z axis to improve the knee bend. (See Illus. 21)
 The weight maps of the new character cannot be adjusted. However, the bulge values can be changed if the joint has bulge values assigned to it. The bulge values can be accessed by selecting the Weight Map Brush tool and the Tool Settings Pane. (See Illus. 22)
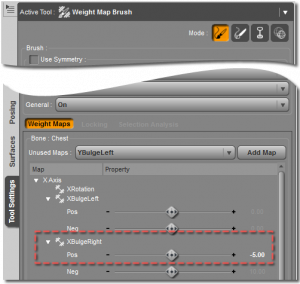 Search under the rotation that needs adjustment (In the case of the knee bend it is the X Rotation). The X Bulge Positive Right value is changed to -5.00 to slightly improve the shin bend. (See Illus. 23)
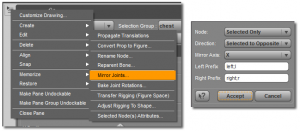
This joint change can be mirrored over to the opposite side. Make sure the Joint Editor and Tool Settings tab are open and select Tab Options, Edit, then Mirror Joints. (See Illus. 24) These options are selected to mirror the changes just made over to the other side.
Be sure to check all the rotations on the joints. Don't forget the eyes and tongue. To check to rotation of the lower jaw, using the mouth open and mouth open wide dials are useful for determining if the center point is in the correct location for that joint. When all the joints are checked and the rig looks as best it can by moving center points and changing bulge values, it is time to ERC freeze the changes made to the morph dial. Repeat the ERC freeze instructions written above to do this. Now it is also a good time to save the figure. Make sure the joints are in their zero position, or joint rotations will be introduced into your character dial. (Do not use restore figure to zero joints before ERC freezing or you will lose your work.)
Sometimes moving the joint centers and adjusting bulges are not enough to take care of joint issues with a character. Here is a list of different options to repair and improve joints for a character.
1. Check the Mesh
Check the mesh over carefully in the area of the joint that is causing trouble. Look for signs of edge-looping being pinched or too close together in the character. Fix those areas in your modeler, and reload the character morph with Morph Loader Pro using the Overwrite Existing Deltas Only option. See if it corrects the problem. Also check the mesh for edge-loop drifting in the area of a joint. This can be more difficult to spot.
Using the elbow again as an example, if the character has edge-looping on the back side that is slightly sliding downward towards to the forearm, and has edge-looping from the front side that slides up the arm in the opposite direction towards the shoulder, the weight maps on the new character have a high probability of causing issues during bending. Restoring the edge-looping by moving these edge-loops back in line with the Genesis mesh will improve the bending.
Trying to spot the drifting edge-loops can be assisted by scrolling the new character dial on and off, and watching how the edge-looping is moving in the new character when compared to Genesis.
2. Joint Controlled Morph Correctives
Creating a JCM to repair the problem joint bend is an option to use after the above options are exhausted. The basic workflow consists of bending the joint to it's full rotation and exporting out the character to a modeler while it is in that position. The joint is then repaired in the modeler and exported out. The repaired version is then loaded via Morph Loader Pro using Reverse Deformations.
The new JCM is then ERC linked to the joint movement to reach it's full strength at the limit of the joint.
This option will be covered in a 3-part tutorial. Advanced Character Creation for Genesis which will cover JCM's, and MCM's (which will correct morphs like EyeBlinks to work on a new character).
It will also cover adding scale to your character to change it's height, as a final step to character creation.
This finishes the first steps in creating your own custom character. Continue with the tutorials listed below for more advanced configuration.