User Tools
Site Tools
Sidebar
How to Set Up Install Manager (WIP)
This page is a WIP. There are likely to be incomplete and or missing steps while the page is being built.
Summary
Install Manager allows you to choose your locations for downloads and installing content. This will walk you through setting up Install Manager to use these locations.
Process Overview
- Install Manager Settings
Foundation
This assumes you have a valid DAZ 3D account, know your login credentials and have already installed Install Manager. If not, please refer to: Installing Install Manager (WIP).
Add a Valid User Account
Step 1
Multiple user accounts can be added to Install Manager. The settings you choose will be on a “Per User” basis - meaning you can set different paths for downloads and preferences for each user.
 Use the shortcut icon on your desktop to open Install Manager.
The first thing you will need to do is add your DAZ 3D store user account. To do this you will need:
- Your eMail Address for your DAZ 3D Account
- Your Password for your DAZ 3D Account
Step 2
- Start by clicking on the “Add Account…” button.
- In the dropdown, select “Add Account…”
- Enter the name that will help you identify this account - This can be anything you choose and will be visible in the dropdown along with its associated email.
- Enter your Email address associated with the account you want to log into.

- Select “Ok”. Your account email will now show in the drop down instead of “Add Account…”

Step 3
 You can now type in your password. This is only required if you are accessing your account online.
If you want to work offline, make sure the “Work Offline” box is checked. If you want to be able to connect to your account online, un-ckeck this box.
Click “Start”
Set up your Download and Install Locations
Step 1

Once you have logged into Install Manager you will see the following screen.
In the top right corner is a small Gear icon. This is where you access your settings.
Click the “Gear icon” now.
Step 2
 Your Settings window has several Page and options:
- Accounts - This will list the account(s) you have added - These can be edited by right-clicking the account name. You can not edit the account you are currently logged into.
- Downloads - Allows you to set the location to save your downloaded files
- Installation - Allows you to set and add Content (Runtime)install paths
- Applications - Lists the location (paths) of your supported applications
- +/- - Add/Remove Accounts on the Accounts Page, or Install Locations on the Installation Page
- Show Log - Click this any time you need to review the log file
- Help - Link to online documentation like this User Guide
- Show Tool Tips - Toggle Tool Tips on and off
You can click the “ + ” in the bottom left corner of the Accounts or Installation pages to add accounts/locations at any time, as needed. Remember, each account can have different download locations and preferences.
For more advanced information on these Features, please see: User Interface (UI)
We will now move to the Downloads Page to begin telling IM where we want things to go…
Step 3

The Downloads and Installation pages are where most of your customization will take place. In Downloads, you tell the application where to save the files you download from your store account.
Download To Where - Click the “ … ” browse button and choose the location you want the application to save any content installers it downloads from your account. This can be on your local drive, or an external location. For help on downloading files from your account, please see Downloading With Install Manager (WIP)
Using the application Show filter - Sometimes finding what you want in your account can be a bit daunting. Especially if you have a large catalog of purchases. In this section, you can filter the products by the application(s) you choose. Different combinations will give different results. If you are expecting a file you do not see, try adding another filter to your selection. Older files are backwards compatible, with some exceptions. This means if you have DAZ Studio 4.5 selected you will see more content than if you select DAZ Studio 3. DS 3 will not read .DSF (DS 4) or .DUF (DS 4.5) files so any of this type content would be filtered out. DS 4.5 will read all files extension, so you would see a great deal more products listed.
Once you have your location added, switch over to the Installation Page…
Step 4
 Install To - If you use one program and have a single location set for content installation, you will see “Recommended Folder”. If you use multiple programs such as DAZ Studio, Poser and Carrara on the same machine, you may have multiple content locations mapped. If you add your various folder paths, you will be able to choose where you want your content to be installed at any given time. For more on this please see Installing With Install Manager (WIP).
- To change the Recommended Folder location, click the “…” browse button next to the path in the list. Browse to the new location.
- To add another location, click the “ + ” button in the lower left corner and browse to the folder location you want to add. Once it is added, you can now select it from the drop down list above.
Any added locations will now be available in the Install To: drop-down selection above.
It is highly recommended that you choose an install location that is different than you currently installed content.
Step 5
The Applications tab simply shows a list of paths where recognized software is located.
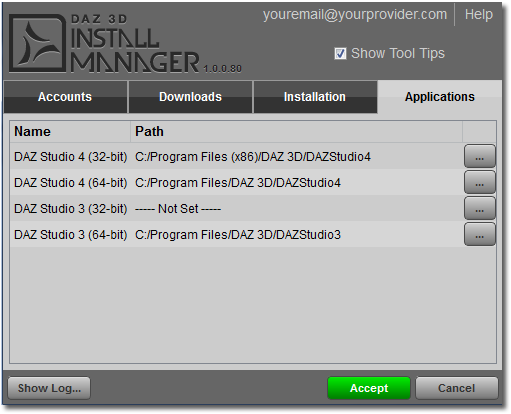
When you are done, select “Accept” and the settings window will save your changes and close. You will now be back in the main interface.
Wrap-Up
You are now ready to begin using Install Manager. For specific help on downloading, installing and managing your content, please see these articles in the User Guide:
If you need further help with Install Manager, please start here:
If you would like more in-depth information, please read:
Page Tools
Except where otherwise noted, content on this wiki is licensed under the following license: CC Attribution 3.0 Unported
