Table of Contents
DAZ Studio 4.x
- QuickStart Guide PDF
- User Guide PDF
This page is a WIP. There are likely to be incomplete and or missing steps while the page is being built.
With the addition of the Content Creator Tools (CCT), more and more people are interested in taking their models into DAZ Studio and creating Content using these new tools instead of using their older methods. This three part tutorial will take you from preparing your model for import into DAZ Studio and all the way through the Weight Mapping procedure.
Preparing your model includes:
Before proceeding with the Rigging Articles, it is assumed you have already created a model in the program of your choice. The following section will give you instruction on preparing your model for import into DAZ Studio so you can utilize the Content Creator Tools (CCT) to Rig the figure.
Here are a couple things to keep in mind when modeling for DAZ Studio use:
Models should be UV Mapped. Refer to Basics: UV Mapping Guidelines (WIP) if you need more information on this topic.
Create Material/Surface groups for the model. Try to use logical and easy to understand names (Claws, Horns, Skin, etc.). Use the modeler of choice for this task, or you may also assign polygons to named surfaces with DAZ Studio using the Polygon Group Editor.
Create Selection Sets (polygon groups) in your modeler. These will be used to designate the bones of the model. This can also be accomplished using DAZ Studio's Polygon Group Editor if you prefer.
Keep the edges of each Selection Sets clean. As an example of what not to do, do not include a few polygons from the thigh area in your foot Selection Set.
DAZ Studio now gives the option of creating starter Weight Maps based on Selection Sets, and it is important to pay attention to the Selection Set grouping to make Weight Map painting easier. Notice the need to remove weight from the thigh to get the foot to work in the above example of what not to do, if you don't keep the Selection Sets clean.
Using the naming conventions r (right)or l (left), and keeping the naming of the Selection Sets consistent from side to side, will help keep symmetry for poses and additional features working in DAZ Studio. (Example: lFoot or rFoot).
The model should load into DAZ Studio, centered on the Ground Plane. It should not land with parts of its body through the ground plane.
The scale should be somewhat relative to the size of the Genesis figure. For example, a dragon's size could be considered subjective. It maybe so large that it dwarfs the size of Genesis, making it difficult to handle in the scene.
 Or it could be so small that its size is more like that of a baby dragon.
In your modeler of choice, load the modeled object as well as the Genesis figure at DAZ Studio scale. Using Genesis as a reference, use your modeler's tools to scale the model to a proper height, and make sure it is settled down flat on the ground plane.
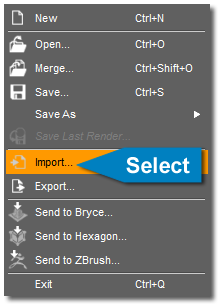
Once the model is final, it is time to load it into DAZ Studio for set up. Save the final model as an obj file. Open DAZ Studio and use File > Import..., (see Illus. 1) and browse to the location of the obj you just saved. Check the object after loading. Look for shading artifacts, or other problems. Did it come in at the correct scale? Is it on the ground plane? If everything looks good, it is time to rig the model. Remove the obj from your scene.
Once you have your model prepared, you are ready to move on to the next step.