Table of Contents
DAZ Studio 4.x
- QuickStart Guide PDF
- User Guide PDF
This page is a WIP. There are likely to be incomplete and or missing steps while the page is being built.
This article focuses on the basic steps necessary to install and load content in DAZ Studio 4. Additionally, this article tells how to bring your existing content into DAZ Studio 4. This is useful for users of DAZ Studio 3 or earlier that want to use their existing content in DAZ Studio 4 without re-installing it.
There are three basic parts of installing and using content in DAZ Studio:
When the first two steps are done right the first time, all future content installations becomes very simple. All three of these steps are important, including the readme which is unfortunately often skipped.
When you buy a product like the Duke Hair you may think of it as one file, but it is in fact made up of 111 separate files. There are many different types of files that make up any given product. Four common types are:
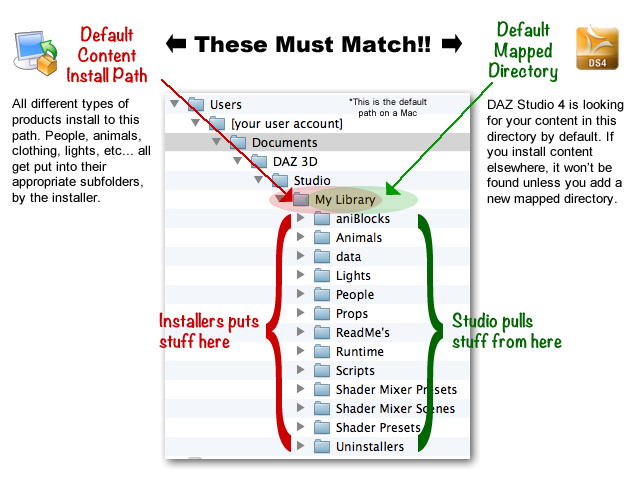
All of these different file types need to be put in very specific places on your hard drive so that DAZ Studio can find them and then serve them up to you. This is one reason why we use installers.
Installers put all the files into the right places, so you don't have to. DAZ Studio has a default location where it looks for files, so that's where you need to install them. You can install products in other locations (not recommended for beginners), you just have to tell DAZ Studio where to look. To do this, follow the steps described in the “Mapping Content Directories” tutorial.
NOTE: Installers must be run as applications. Placing the installer file itself into the My Library or Runtime folder does not install the content.
TIP:Many content products consist of several installers. As a rule of thumb, run all of the installers provided, regardless of whether they are designated for DS (_ds_) or for Poser (_dpc_). There are some exceptions, but more often than not, you'll need both the files from the DS installers and the DPC installers. Installers for Carrara (_ca_) are obviously not needed in DAZ Studio.
Check for your Platform below to see what is the recommended install path for content in DAZ Studio 4:
MAC USERS
PC USERS (WINDOWS VISTA, WINDOWS 7)
PC USERS (WINDOWS XP)
The screen shot below shows the destination directory step during content installation. Find the recommended install path above and then either enter it into the “Destination Directory” box shown below, OR, use the 'browse' button to browse to the correct path.
The next time you use the Bit Rock installer it will probably default to that path, so you won't have to browse to that same path each time.
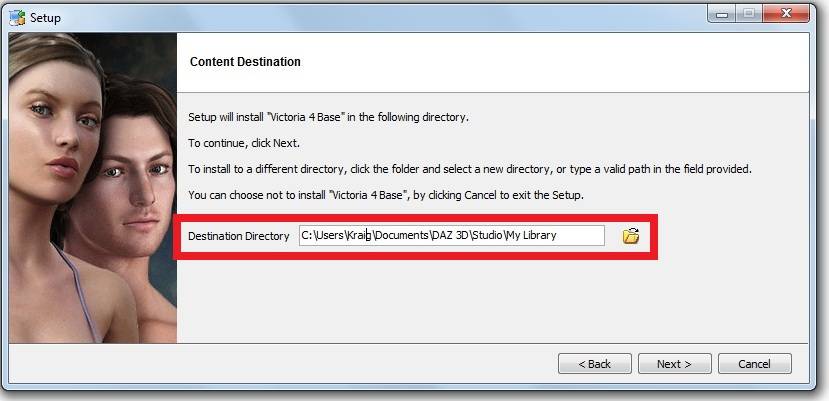
The install path is where all content, regardless of type should be installed. People, animals, clothing, lighting, material, etc… will all be installed into their appropriate subfolders underneath the install path.
TIP: There are several different kinds of installers… some will remember your install path and some will not. So, it's a good idea to write down your install path for future reference.
New Users and some experienced users often forget this step. The readme is a very simple document that tells you where to find the content when your Tab is in FOLDER VIEW. Some readme's will have additional information on product use.
If you don't use the readme, you will have to hunt and peck for the content in the content tab. Users with a large content library will have a lot of work to do indeed without using the readme.
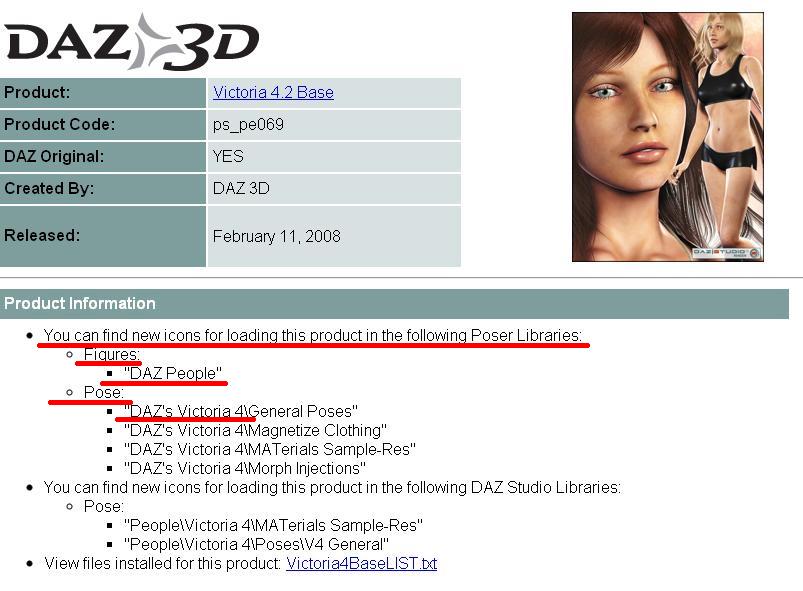
Here's a screen shot of the readme for Victoria 4.2 base. Notice the text underlined in red. These tell you where to find the components of the product. Instead of hunting and pecking through the folders, you can see that the first place to look is in the Poser half of the content tab in FIGURES –> DAZ People where you'll find the Victoria 4.2 base. That's a lot easier than looking in the People folder or searching through every folder in FIGURES.
If you would like to understand the basic differences between the Smart Content Tab and the Content Library Tab, read the following article.
The following legacy resources deal with DAZ Studio 3 content configuration:
Jakiblue's Tutorial on Organizing Content
Forum Tutorial
Dave Fromader’s video tutorials at Cellar Studio
Understanding Content Installation in DAZ Studio
This article explains in more detail for curious users and includes information for the hybrid nature of content in DAZ Studio.
