Table of Contents
DAZ Studio 4.x
- QuickStart Guide PDF
- User Guide PDF
Creating ERC with Joint and Morph Controls for Folding a Dragons Wings
DAZ Studio's Property Editor is very useful for creating advanced controls for custom figures. Rigging wings has always been a challenge, but using Morph controlled joints can give figures a more realistic look when posing.
If just a morph alone was created to fold the wings, the resulting morph would only work well at it's full value. All the in between values of the morph dial would crumple and distort the wings. By combining morphs and joint movements, the distortion can be greatly reduced, and the full range of the dial can be useful to the end user.
Although this will walk you through the process of some basic rigging for this dragon figure, you should have a basic understanding of DAZ Studio 4. DAZ Studio 4.0.3.47 or newer is required for this tutorial.
You should also make sure you have completed Intermediate Rigging: Creating ERC Part 1 before starting Part 2.
For this tutorial the SubDragon was used. Open up the SubDragon in DAZ Studio. Make sure the figures joints are set to zero (Zero Figure), and all the morphs are set to zero before starting (Zero Figure Shape). This is to avoid having undesired morphs or joint movement in the ERC set up for the wings.
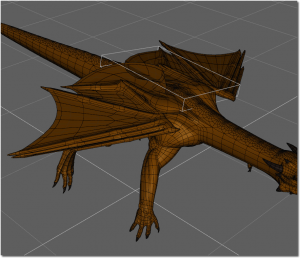 The wings should be posed to bring them closer to a folded position. (See Illus.1) The Parameter dials alone are not sufficient to make a nice looking set of folded wings for this figure. The goal is to add a morph target to take the wings the rest of the way, and will work with ERC that moves the joints of the wings, when the morph is dialed.
A pose preset is now saved to DAZ Studio's library. While not absolutely necessary, it is very useful if Studio needs to be closed., and work needs to be returned to later. A morph will be created using the SubDragons current position and pose, and it is vital that the morph be reversed out of this exact position the SubDragon is in.
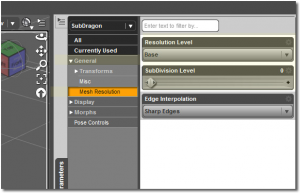 Once the pose preset is saved, it is time to make the morph which will correct the dragon's wings, making them appear more folded. The SubDragon is a subdivided figure. When exporting the SubDragon out of DAZ Studio to make the morph, Parameters Pane > General > Resolution Level, select > Base. Set Subdivision Level to 0. (See Illus.2) Export out as an obj, File > Export... > Obj and work on the morph in a modeling application.
![]()
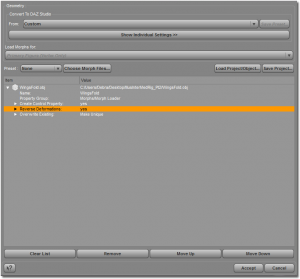 When your morph is complete in the modeling application, select the SubDragon in the scene tab. The dragon must be in the exact pose and position you used to export out the starting morph. If not, use the pose you saved to return it to the same position and pose. Use Morph Loader Pro... to load in the new morph. (See Illus.3) Make sure Reverse Deformations value is changed to yes (See Illus.4)and choose accept.
Reverse Deformations will apply the new morph just made to the figure, but it will reverse out of the morph the current state of the figure (which includes morphs, position, and joint rotations) leaving in the new morph only what is needed to repair the problem. That is the magic of reverse deformations.
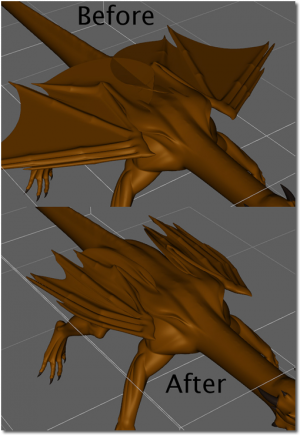 By default, the new morph will be found under Morphs > Morph Loader. Look for your morph and set the dial to 100 percent. If the morph looks satisfactory, it is time to create the ERC connections to make everything work together. (See Illus.5)
Verify that the new WingsFold morph is set to 100 percent. The dragon should still be in the exact same pose and position you used to make the exported morph from.
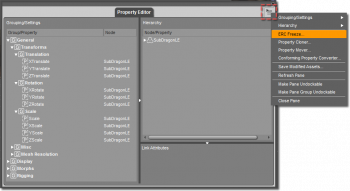
Open Up Property Editor (See Illus.6). Choose Tab Options and select ERC Freeze. (See Illus.7) This opens up the ERC Freeze Options. Under the Figure Option choose SubDragon, also choose SubDragon for the node.
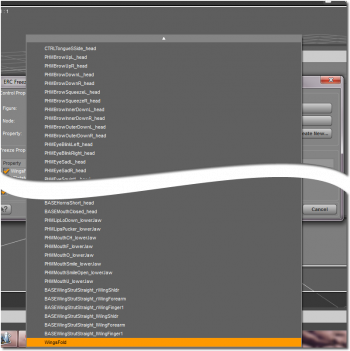
 For the Property, select on the tab with the default X Translate to open up the menu of available properties in the SubDragon. At the bottom of the list, WingsFold, the new morph just loaded, now appears. (See Illus.8) Select it. WingsFold now appears in the Property: box. Choose Accept, and close the Property Editor. The WingsFold morph now controls the joint movement of the wings, and the wings fold up nicely.
As a final step, the limits of the WingsFold dial will need to be set to work from 0 to 100 percent. This type of ERC hookup that involves a morph does not work well in negative values.
Save the figure, or export out the morph as a .dsf file to avoid overwriting the current figure.
This concludes the Creating ERC tutorial. You can now return to the main Content Creation tutorial section, or you can review part one of Creating ERC.