Table of Contents
DAZ Studio 4.x
- QuickStart Guide PDF
- User Guide PDF
This page is a WIP. There are likely to be incomplete and or missing steps while the page is being built.
You made it to the final part of our Rigging tutorial and are now ready to start setting up your Weight Mapping. Part III will walk you through the different steps of Weight Mapping and introduce you to new tools in DAZ Studio 4.5, such as the Fill Weight by Selection Sets .
By the time you finish this section, you should be able to:
Before proceeding with the Rigging Articles, it is assumed you have already created a model in the program of your choice, as well as finishing Basic: Rigging Preparation (WIP) and Basic: Adding Bones for Rigging (WIP) sections. The following section will give you instruction on Weight Map Rigging.
Weight Mapping involves assigning values to a weight map for a bone with a brush tool or gradient tool. The goal is to come up with smooth bending joints that behave realistically.
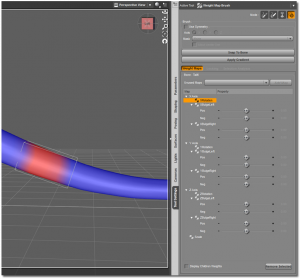
 DAZ Studio's Weight Map Brush Tool can be found by selecting the Weight Map Brush Icon, (See Illus.1) and looking under the Tool Settings Option Menu. There are two main options to consider before starting.
You should decide between General Weight Mapping and TriAx Weight Mapping.
For the Dragon Model, Triax Weight Mapping was used to get the extra control in the wings and the curved neck and curved tail.
Also, if you are not familiar with the Tools for Weight Mapping, you can refer to the Weight Map Direct Editing document for further information.
 To Start, make sure to have the Weight Map Brush Tool selected and open the Tool Settings Pane (See Illus.2) and choose a starting joint to begin your work..
 Next, select the rotation to weight. Have one selected to get a weight map to display. Choose X Rotation, Y Rotation, or Z Rotation to start. Now notice that the model in the display has turned blue. This is the unweighted weight map. Blue equals no weight, Red equals weight. (See Illus.3)
Choose the paintbrush to start adding weight by painting directly on the model where the joint is. Painting with the brush takes longer, but it provides more control.
Choose a gradient to apply a quick starter map to refine with the brush. In many cases the Sphere gradient is useful for laying down a quick weight map to refine with the Paint and Smooth Brush.
TIP: One new tool introduced in DAZ Studio 4.5 is the “Fill Weight by Selection Sets”. Make sure you are in the Weight Tool Pane, then Right-click in the Viewport. Select the tool from the menu. This tool allows you to create a starter weight map for each selection set for the model, which you can then refine with the weight brush tools.
It is useful to bend the joint to the point where it starts showing bad deformations, (or to the point where you have set your joint limits) and use that as a starting point to refine with the Paint Brush and Smoothing Brush. (See Illus. 4)
Test the joint in both directions, at the limits where the joint is to be set. Continue refining the joint with the brush tools until it is satisfactory, and move on to the next.
Here is the finished version of the weight map for this joint. (See Illus. 5)
If the joint needs more refinement, the Bulge Maps can be used. The bulge maps can create a “push in” or “push out” effect in the area where you paint a map. Bend the joint to its limits. Choose either XBulgeLeft or XBulgeRight, and paint the map in the trouble area. This will only be seen if a change to the Pos (Positive) or Neg (Negative) Slider is set with a value. Whether the map is affected by either the Pos or Neg value depends on the Rotation Order of the bone. (See Illus.6)
For this project, the model is weighted the Left legs and Left wings first. Then weighted the trunk, neck, head and tail. At this point the model can be mirrored to the weight maps from the Left to the Right side of the model.
TIP: The Polygon Selection can be very useful for hiding areas of the model while weight mapping, or even locking polygons of the model while you work. (See Illus. 33) As an example, if you wanted to limit the weight mapping to just two joints only, select and lock all the polygons not wanted to be affected by the weight map brush as the maps are painted.
If the model is symmetrical, use the Weight Map Symmetry Tool to copy the weight maps from the left side over to the right side.
With the Weight Map Tool (Tool Settings Option Menu) selected, Right Click in the Scene and choose Weight Map Symmetry.... (See Illus. 7)
The hard work is now finished. Test out the new rig by posing the figure. If everything looks good, add your morphs and textures.
To return to previous parts in this series: