User Tools

Site Tools


Brushes and Painting

Introduction

In order to sculpt and paint your objects, Hexagon provides a set of tools which have their respective specifics and workflow. It is, however, important to note that these tools share common parameters, making it easier to learn and to use these tools.

Principles of the Displacement and Painting Tools

To generate polygon displacement, or to paint colors and textures, Hexagon uses a concept of “virtual paint brushes”. They can be compared, as mentioned in the previous chapter Surface Displacement Modeling, to the tools of traditional painting and sculpting.

In Hexagon, these “virtual paint brushes” are called “Brushes”, both for painting and sculpting. When you use these brushes, they are always oriented perpendicularly to the surface you are working on, and never aligned with the view plane. Brushes will be used to push and pull the geometry of your model, according to predefined or custom patterns, and to apply colors, textures and transparency. You will thus be able to sculpt and paint objects as you would do in the real life.

Some parameters are similar for all tools which use brushes, such as size and strength, some other parameters are specific, such as opacity, which makes sense only with paint tools, and so on.

The Working Channels

Hexagon brushes allow you to work on several “information layers”, called Channels. The cumulative work performed in each channel will give you the final result on the 3D model.

Hexagon provides the following channels:

  • The displacement channel, allowing you to modify the object's geometry.
  • The bump channel, which lets you simulate a geometry displacement on your model.
  • The color channel, allowing you to paint some color on an object.
  • The transparency channel, which lets you paint transparency areas on an object.

All displacement and painting tools do not necessarily work on the same channel. For example, it will not be possible to use a polygon displacement tool on the transparency channel of an object. in the same way, the paint tool will not work on the displacement channel.

You will find the list of the channels in which a tool operates in each tool description section of this manual.
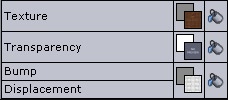
four_channels.jpg
The four channels.

Note: Some channels need textures to work, and thus need the UV-mapping to be completed. In that case, it is mandatory to perform the UV-mapping before being able to work using these channels.

Revealing Textures to Paint or to Displace

Doing displacement or paint with brushes can be performed either with a single depth intensity, respectively color, or using a hidden texture, which you will reveal according to your mouse movement and pressure, respectively as a relief pattern or as a color map. This means that you will make an image appear, as a texture or a relief, which was previously applied onto your entire model.
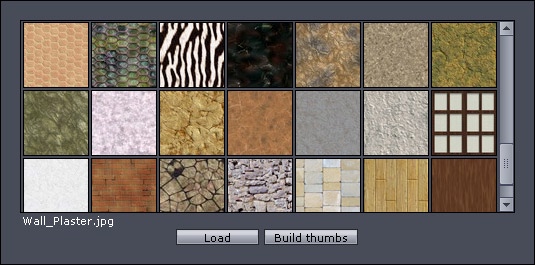
some_patterns.jpg
Some patterns.

This is an efficient way to easily create rich and high quality textures, as well as to generate complex displacement patterns by mixing different textures sequentially, using a weak and variable strength and opacity.

In the Hexagon tools that provide this capability, you will be able to choose in one or several channels, either a color, or a texture to reveal.


Brush Shapes

In addition to the default brush, it is possible to use custom brushes, based on patterns in grey levels.

These brushes allow you to work as you would with inking pads, e.g. with several small strokes, to apply your patterns here and there or at the opposite, performing a continuous tracing. The result will, of course, be very different.

Hexagon provides by default a set of various brush shapes, allowing you to satisfy directly most of your needs.
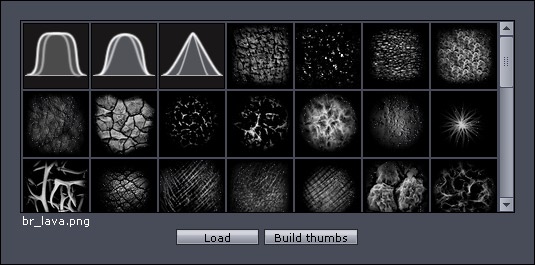
brushes_preview_window.jpg
The brushes preview window.

Load Your Own Brushes or Textures to Reveal

There are two ways to load, in a permanent way your own images into Hexagon to be used as a base to create custom brushes and textures to reveal.
  • First method:
    • Launch a paint / displacement tool
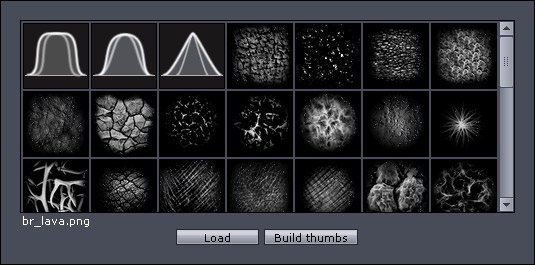
    • Click on a thumbnail of a brush or a texture to open the window showing all brushes and textures of the application.
    • At the bottom of the window, click on the Load button.
    • A system dialog box appears. Choose the brush or texture image you want to import, and click on the Open button.
    • Your image is loaded, and its preview thumbnail is created.

load_button.jpg
The Load button on the bottom of the brushes window.

  • Second method:
    • On Windows, open the Hexagon installation folder, and go the Data\brushes sub-folder.
    • On MacOS, right-click on the Hexagon application icon, then choose “Show package content”. Then go to the Contents/MacOS/Data/brushes sub-folder.
    • A list of folders appears:
      • brushmasks contains all images used as brushes. These images are in PNG format.
      • bumpmaps contains images used as bump textures to reveal.
      • textures contains images used as color textures to reveal.
      • transparencies contains images used as transparency textures to reveal.
    • Copy in this folder, the images you want to use.
    • Re-launch the application to have these new brushes/textures available in Hexagon.

Remarks:

  • For better quality, it is recommended that you use only square images, and not rectangular, both for brushes and textures to reveal. Feel free to get inspired from the default content provided with Hexagon.
  • If you decide to manually copy image files into the application folder (second method as above), you'll also want to add a thumbnail of the image, as a 64*64 pixels image, named “your-file-name” with the “_thumb” suffix. This will, for example, give for the texture named “old_wood.jpg”: “old_wood_thumb.jpg” as the name of the thumbnail.
  • Hexagon supports, as textures to reveal, the BMP, JPG, PNG, TIFF and GIF file formats, although GIF is not recommended, since it can only handle 256 colors, which is too weak a resolution for quality textures.
  • As specified in the second method description, images to be used as brushes must be in PNG format (non-destructive format).

Brushes Display

To work more efficiently with brushes, Hexagon uses a specific display which is different from the default cursor, and includes:
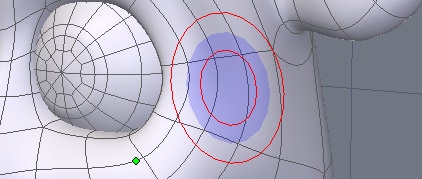
  • Two color circles (which can vary according to the usage) corresponding to the diameter of the brush and its hardness, and;
  • A plain blue circle, corresponding to the strength or the opacity of the brush.

brush_display.jpg
The brush display.

Types of Strokes

To use brushes on models, both for displacement and painting, Hexagon provides two types of strokes: freehand, which enables you to draw a continuous tracing of the element selected; and dots, which dots the element across the screen if the speed of the pointer is fast, or continuously (similar to freehand) if you move the pointer slowly.

In the freehand tracing mode, if the movement speed is too high, a blue curve will follow the mouse movement, to show you the drawing path. The displacement or paint action will be performed with a slight delay.


Working With the Graphic Tablet

To displace your geometry or paint with more accuracy and ease, Hexagon supports all major standard graphic tablets.

It is possible to link the stylus pressure value with some displacement or painting tool parameters. It will be possible, for example, to control the strength or the brush radius thanks to the tablet's stylus.

You will find, on the right of the parameters panel of tools, a check box aside some parameters. These check boxes are called “Bindings”, and checking them will specify that the stylus pressure is bound to the corresponding parameter: the harder you press, the higher the value will be:

The stylus pressure will modulate the value of the tool parameter. This means that if the default value is 50, for example, the pressure will modulate this value from 0% (light touch) to 100% (maximum pressure), the maximum pressure fitting this value of 50.

If we wish to get a maximum intensity variation, we will have to set this value to the maximum possible, e.g. to 100.

Working with Symmetry

As for the usual modeling, Hexagon can use the symmetry mode, available from the property panel, in order to replicate in a symmetrical way the polygon displacement, as well as the painting operations.


Using Displacement and Painting Tools

You will find below the description of the displacement and painting tools. You will notice as you read through this document that these tools globally share the same functions and a similar user interface.

Displacement Brush

The displacement brush tool allows you to displace polygons on a model, either toward the inside or the outside of the surface, based on the normal to the surface.

Usage:

  • Take the displacement brush tool, located in the UV & Paint tool tab.
  • A cursor looking like a red circle appears
  • Choose the working channel, if needed: displacement or bump.
  • Click-and-drag on the object, to push and pull polygons.
  • This tracing will be done according to the different tool's options.
  • Validate the tool to end using the displacement brush.

Options:

  • Real-time Symmetry: If the symmetry mode is on, this option will perform all displacement operations in real time on the other side of the model. This can cause slower performances when working on a complex model. If this mode is off, the symmetric calculation will be performed at the end of the action, e.g. when the mouse button or the stylus will be released.
  • Size: Lets you define the size of the brush. This value can be handled with the pen tablet.
  • Strength: Allows you to define the depth/height of the displaced polygons. This value can be handled with the pen tablet.
  • Hardness: Lets you define the brush size attenuation, allowing you to make a blur between the hardness radius and the influence size.
  • Brush: Lets you choose a brush pattern.
  • Stroke: Defines the kind of tracing: Freehand (continuous) or in dot mode.

Tool Channels:

The displacement brush tool works on the following channels:

  • Displacement, which allows you to displace the geometry.
  • Bump, which lets you simulate a geometric displacement. Important: working in this channel necessitate that the UV-mapping has been previously performed.

Remarks:

  • To be able to paint bump on a model, it needs to have a material affected to it. If there is no texture in the bump channel, a default texture will be automatically created.
  • The model must also have UVs and if possible, UVs which do not overlap. With no UVs, it is impossible to display textures

Tool Shortcuts:

  • Shift key held: performs the opposite operation – polygons will be pushed instead of being pulled. The cursor circle turns from red to green.
  • Ctrl/Command held: invokes the soften tool, while not releasing the displacement brush. The cursor circle turns from red to blue.
  • Ctrl/Command + Shift held: allows you to change the influence radius of the tool: click-and-drag from left to right increases the radius, and from right to left decreases it. From bottom to top increases the strength, and from top to bottom decreases the strength. The cursor circle turns from red to yellow.


Soften

The soften tool allows you to attenuate details on a model, as if it was smoothing the surface. This tool is very convenient to adjust and refine the result of displacement brushes, to get a soften effect on displacements which are too pronounced. The soften tool has no effect on painting operations.

Usage:

  • Take the soften tool, located in the UV & Paint tool tab.
  • A cursor looking like a blue circle appears
  • Click-and-drag on the object, to smooth polygons.
  • This tracing will be done according to the different tool's options.
  • Validate the tool to end using the smooth tool.


Options:

  • Real-time Symmetry: If the symmetry mode is on, this option will perform all operations in real time on the other side of the model. This can cause slower performances when working on a complex model. If this mode is off, the symmetric calculation will be performed at the end of the action, e.g. when the mouse button or the stylus will be released.
  • Size: Lets you define the size of the brush. This value can be handled with the pen tablet.
  • Strength: Allows you to define the strength of the smoothing. This value can be handled with the pen tablet.
  • Hardness: Lets you define the brush size attenuation, allowing you to make a progressive smooth between the hardness radius and the influence size.
  • Stroke: Defines the kind of tracing: Freehand (continuous) or in dot mode.

Tool Channel:

  • The soften tool operates only in the displacement channel.

Tool Shortcuts:

  • Ctrl/Command held: invoke the soften tool within the displacement brush tool, or within the pinch and inflate tools.
  • Ctrl/Command + Shift held: allows you to change the influence radius of the tool: click-and-drag from left to right increases the radius, and from right to left decreases it. From bottom to top increases the strength, and from top to bottom decreases the strength. The cursor circle turns from red to yellow.

Pinch

The pinch tool lets you draw polygons together, according to the tracing of the brush, creating a geometric pinching. It is the ideal tool to create pleats and wrinkles.

Usage:

  • Take the pinch tool, located in the UV & Paint tool tab.
  • A cursor looking like a red circle appears.
  • Click-and-drag on the object, to pinch polygons.
  • This tracing will be done according to the different tool's options.
  • Validate the tool to end using the pinch tool.

Options:

  • Real-time Symmetry: If the symmetry mode is on, this option will perform all operations in real time on the other side of the model. This can cause slower performances when working on a complex model. If this mode is off, the symmetric calculation will be performed at the end of the action, e.g. when the mouse button or the stylus will be released.
  • Size: Lets you define the size of the brush. This value can be handled with the pen tablet.
  • Strength: Allows you to define the strength of the pinching. This value can be handled with the pen tablet.
  • Hardness: Lets you define the brush size attenuation, allowing you to make a progressive pinch between the hardness radius and the influence size.
  • Stroke: Defines the kind of tracing: Freehand (continuous) or in dot mode.

Tool Channel:

  • The pinch tool operates only in the displacement channel.

Tool Shortcuts:

  • Ctrl/Command held: invoke the soften tool, while not releasing the pinch tool. The cursor circle turns from red to blue.
  • Ctrl/Command + Shift held: allows you to change the influence radius of the tool: click-and-drag from left to right increases the radius, and from right to left decreases it. From bottom to top increases the strength, and from top to bottom decreases the strength. The cursor circle turns from red to yellow.

Inflate

The inflate tool lets you push polygons according to their respective normal, which will make inflate areas of the surface. The inflate tool will let you create easily all kinds of puffiness, bulges and swells.

Usage:

  • Take the inflate tool, located in the UV & Paint tool tab.
  • A cursor looking like a red circle appears
  • Click-and-drag on the object, to inflate polygons.
  • This tracing will be done according to the different tool's options.
  • Validate the tool to end using the inflate tool.

Options:

  • Real-time Symmetry: If the symmetry mode is on, this option will perform all operations in real time on the other side of the model. This can cause slower performances when working on a complex model. If this mode is off, the symmetric calculation will be performed at the end of the action, e.g. when the mouse button or the stylus will be released.
  • Size: Lets you define the size of the brush. This value can be handled with the pen tablet.
  • Strength: Allows you to define the strength of the inflate action. This value can be handled with the pen tablet.
  • Hardness: Lets you define the brush size attenuation, allowing you to make a progressive inflate between the hardness radius and the influence size.
  • Stroke: Defines the kind of tracing: Freehand (continuous) or in dot mode.

Tool Channel:

  • The inflate tool operates only in the displacement channel.

Tool Shortcuts:

  • Shift key held: performs the opposite operation: polygons will be pushed instead of being pulled. The cursor circle turns from red to green.
  • Ctrl/Command held: invoke the soften tool, while not releasing the inflate tool. The cursor circle turns from red to blue.
  • Ctrl/Command + Shift held: allows you to change the influence radius of the tool: click-and-drag from left to right increases the radius, and from right to left decreases it. From bottom to top increases the strength, and from top to bottom decreases the strength. The cursor circle turns from red to yellow.

Paint

The paint tool lets you, as its name sounds, paint color on a 3D model, as well as transparency, or the reveal textures. The paint tool will allow you to bring your own touch on the model, very quickly and in an intuitive way.

Usage:

  • Take the paint tool, located in the UV & Paint tool tab.
  • A cursor looking like a red circle appears.
  • Choose if needed the working channel: texture or transparency.
  • Click-and-drag on the object, to paint polygons or to reveal a texture, in a continuous way.
  • This tracing will be done according to the different tool's options.
  • When painting transparency, the color is not taken into account, but its corresponding value in grey level (for example, a bright red will give a middle grey). A white color will paint transparency, since a black color will paint opacity.
  • Validate the tool to end using the paint tool.

Options:

  • Real-time Symmetry: If the symmetry mode is on, this option will perform all painting operations in real time on the other side of the model. This can cause slower performances when working on a complex model. If this mode is off, the symmetric calculation will be performed at the end of the action, e.g. when the mouse button or the stylus will be released.
  • Size: Lets you define the size of the brush. This value can be handled with the pen tablet.
  • Opacity: Allows you to define the opacity of the color. The most important is the value, the most opaque is the color or texture. This value can be handled with the pen tablet.
  • Hardness: Lets you define the brush size attenuation, allowing you to make a progressive result between the hardness radius and the influence size.
  • Brush: Lets you choose a brush pattern.
  • Stroke: Defines the kind of tracing: Freehand (continuous) or in dot mode.

Tool Channels: The paint tool operates in the following channels:

  • Texture, which allows you to paint or to reveal a texture.
  • Transparency, which lets you paint a transparency or reveal a transparency texture.

Remarks:

  • In order to paint a model, it must have a material containing a texture.
  • The model must have UVs and if possible, UVs which do not overlap. With no UVs, it is impossible to display and thus paint textures.

Tool Shortcuts:

  • Ctrl/Command + Shift held: allows you to change the influence radius of the tool: click-and-drag from left to right increases the radius, since from right to left decreases it. From bottom to up increases the strength, and from up to bottom decreases the strength. The cursor circle turns from red to yellow.

Brush

The brush tool brings together all displacement and painting capabilities: using the brush tool, you will be able to apply displacement, bump, color and texture, and transparency, even mixed if needed with textures to reveal. For example, this combined tool will let you create veins by painting the color simultaneously to the relief.

Usage:

  • Take the brush tool, located in the UV & Paint tool tab.
  • A cursor looking like a red circle appears.
  • Choose if needed the working channel: displacement, bump, texture or transparency.
  • Click-and-drag continuously on the object, to paint displacement, bump, color, transparency, or to reveal a texture.
  • This tracing will be done according to the different tool's options.
  • When painting transparency, the color is not taken into account, but its corresponding value in grey level (for example, a bright red will give a middle grey). A white color will paint transparency, since a black color will paint opacity.
  • Validate the tool to end using the paint tool.

Options:

  • Real-time Symmetry: If the symmetry mode is on, this option will perform all operations in real time on the other side of the model. This can cause slower performances when working on a complex model. If this mode is off, the symmetric calculation will be performed at the end of the action, e.g. when the mouse button or the stylus will be released.
  • Size: Lets you define the size of the brush. This value can be handled with the pen tablet.
  • Opacity: Allows you to define the opacity of the color. The most important is the value, the most opaque is the color or texture. This value will only affect texture and transparency channels and can be handled with the pen tablet.
  • Hardness: Lets you define the brush size attenuation, allowing you to make a progressive result between the hardness radius and the influence size.
  • Brush: Lets you choose a brush pattern.
  • Stroke: Defines the kind of tracing: Freehand (continuous) or in dot mode.

Tool Channels:

The brush tool works in the following channels:

  • Displacement, which allows to sculpt detailed geometry or to reveal a displacement texture.
  • Bump, which simulates a geometric displacement, or to reveal a bump texture.
  • Texture, which lets you paint or reveal a texture.
  • Transparency, which allows you to paint transparency, or to reveal a transparency texture.

Remarks:

  • In order to paint a model, it must have a material containing a texture.
  • The model must have UVs and if possible, UVs which do not overlap. With no UVs, it is impossible to display and thus paint textures.

Tool Shortcuts:

  • Shift key held: performs the opposite operation: polygons will be pushed instead of being pulled. The cursor circle turns from red to green. This action is only active in the displacement and the bump channels.
  • Ctrl/Command held: invoke the soften tool, while not releasing the brush tool. The cursor circle turns from red to blue.
  • Ctrl/Command + Shift held: allows you to change the influence radius of the tool: click-and-drag from left to right increases the radius, since from right to left decreases it. From bottom to up increases the strength, and from up to bottom decreases the strength. The cursor circle turns from red to yellow.

Exporting Textures

Hexagon does not offer image rendering. As such, you need to export the created 3D models along with associated textures, toward a rendering solution.

You will find additional information regarding materials and their export in the corresponding section of this User's Manual.

Color and Transparency Textures

Regarding the export of textures, two solutions are available, depending on the way you have created your material before starting to paint:

  • First solution: You have created a new material and, in the texture channel, you have loaded an existing image from your computer:
    • When saving your file, the texture will be automatically updated, replacing the file loaded into your material.
    • The texture remains at the same location as when it was loaded.
    • Attention! If the texture you loaded into your material is in a format which does not support alpha channel (not in RGBA format), all the transparency information will be lost when you will reload your file! Please take care to load all your textures with images which are in a format which supports alpha channel, such as PNG.
  • Second solution: You have created a new material and, in the texture channel, you have loaded a blank image in a predefined format (for example: 1024×1024 Texture):
    • When saving your file, the texture will be automatically created in the same folder as the open document.
    • The texture will be saved in PNG format, using the same name as the open document, with a numeric suffix.
    • For further saves, the created image will be replaced by updates of the texture.

Remark:

As mentioned in the first method, the transparency is considered as an alpha channel of the color. Both data will be stored in the same file.

Bump Textures

Regarding the export of textures, two solutions are available, depending on the way you have created your material before starting to paint:

  • First solution: You have created a new material and, in the bump channel, you have loaded an existing image from your computer:
    • When saving your file, the texture will be automatically updated, replacing the file loaded into your material.
    • The texture remains at the same location as when it was loaded.
  • Second solution: You have created a new material and, in the bump channel, you have loaded a blank image in a predefined format (for example: 1024×1024 Texture):
    • When saving your file, the texture will be automatically created in the same folder as the open document.
    • The texture will be saved in PNG format, using the same name as the open document, with a numeric suffix.
    • For further saves, the created image will be replaced by updates of the texture.

Displacement Maps

The polygon displacement performed by the displacement brush tool, as well as associated tools, is not handled internally as a texture. However, all rendering applications use grey-level images (displacement maps) to re-create the displacement between the control shape and the finest sculpted details.

Hexagon provides a tool which allows you to convert geometric displacement information into a displacement map.

Usage:
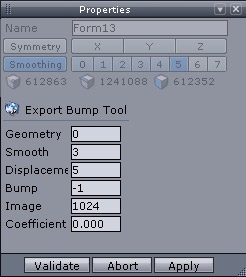
  • Select the object from which you want to export the geometric displacement as a displacement map.
  • Take the displacement brush tool, located in the UV & Paint tool tab.
  • In the properties panel, specify the appropriate values corresponding to the different parameters:
    • Exported Geometry: the object smoothing level which will be exported. If you export the control shape (model with no smoothing), the value to specify will be “0”.
    • Smoothing Range: The smoothing range you intend to apply to the exported model in the rendering application.
    • Displacement Level: The maximum smoothing level on which you want to compute the displacement map. If the highest smoothing level on your model is 5, specify “5” for this parameter.
    • Map Size: the size of the image which will be generated and exported as displacement map. The image will be square, thus only one value must be specified, such as “1024”, “2048”, etc.
  • Validate to quit the displacement map tool. At this time, a system dialog box will appear, and you will be asked where you want to save the displacement map, as well as the wanted image file format. The file name will be followed by a suffix indicating the intensity value of the map, to be reported in the parameters of your rendering application.

displacement_map_tool_properties.jpg
The displacement map tool properties.

Remark:

  • For better results, it is recommended that you choose an image file format which supports 16-bit grey levels, such as the tIFF format. Other formats propose only 8-bit grey levels, which will encode a poorer quality displacement texture.