Table of Contents
- Utilities
Modeling is often the assembly of several simple objects, with the goal of creating a complex one, such as when a link, duplicated several times in rotation, becomes a chain. Like making complex multiple copies, Hexagon offers a great number of tools which will help you with your modeling of varied objects.
![]() The stretch tool lets you edit the structure of objects, much like the basic
3D Manipulators. This tool is more used for modifying curves or surfaces
constructed with curves.
The stretch tool lets you edit the structure of objects, much like the basic
3D Manipulators. This tool is more used for modifying curves or surfaces
constructed with curves.
This tool also is the only one to modify certain dynamic geometry, like the construction forms for an arc, or the depth of a boolean punch.

From left to right: a series of edges stretched with a horizontal constraint.
Usage:
Options:
Remarks:
Keyboard shortcut: Space bar: Lets you apply a horizontal, vertical or no constraint when moving a selection. See the use of 3D rulers.
![]() The lay on tool lets you reposition one object on another, so that the selected
faces are against each other, aligning the center of each face.
The lay on tool lets you reposition one object on another, so that the selected
faces are against each other, aligning the center of each face.
Positioning objects that are not situated in the traditional 3D axes can be problematic. For example, this tool can help you place a logo on an inclined surface, so that the angle is a perfect match between the two objects.

Left: the object to lay on. Right: the object in its final position.
Usage:
Options:
![]() The snap/align tool lets you displace an object by way of a starting point,
often placed on the object to be moved, towards an arrival point, or align an object
in relation to another object.
The snap/align tool lets you displace an object by way of a starting point,
often placed on the object to be moved, towards an arrival point, or align an object
in relation to another object.
Snap is placing an object precisely on another object. Alignment is placing one object precisely in relation to another object
Snap can be useful to precisely position an object on another. This tool will easily place a cushion on a chair, or a teacup on its saucer.
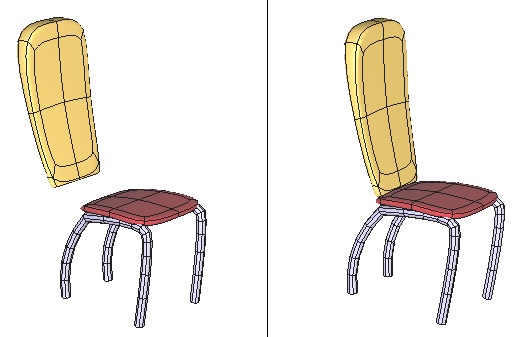
Left: the objects before snapping. Right: the objects in their final position.
Alignment is useful for placing one object precisely in relation to another object. Use this tool to align wheels on a car together.
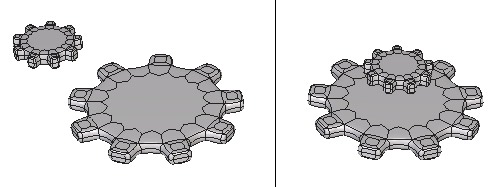
Left: the objects to align. Right: the objects are aligned along the vertical axis.
Usage:
Remarks:
Keyboard shortcut: Space bar: Lets you apply a horizontal or vertical or no constraint when aligning.
![]()
![]()
![]() The Taper, Bender and Twister tools are global modifiers, which let you
apply a transformation on the whole object or on a previously made selection on
an object. The three tools function the same.
The Taper, Bender and Twister tools are global modifiers, which let you
apply a transformation on the whole object or on a previously made selection on
an object. The three tools function the same.

From left to right: the original object, then tapered, bent and twisted.
Usage:
Options:
Remarks:
Keyboard shortcuts:
![]() The “Deformer” tool, also known as the NURBS-based Free Form Deformation (NFFD)
cage, lets you globally modify the shape of an object, by modifying a three
dimensional matrix of vertices which form a cage around the object.
The “Deformer” tool, also known as the NURBS-based Free Form Deformation (NFFD)
cage, lets you globally modify the shape of an object, by modifying a three
dimensional matrix of vertices which form a cage around the object.
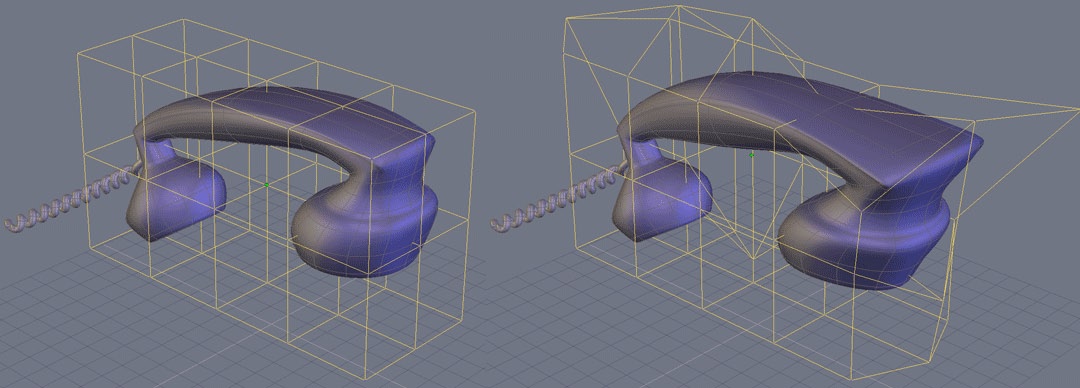
On the left, the original object, on the right, the deformed object.
Usage:
Options:
Remark:
![]() The bend tool lets you bend an object with reference to a 2D line.
The bend tool lets you bend an object with reference to a 2D line.

Left: the object before and the deformation curve. Right: the bent object.
Usage:
Remarks:
![]() The copy tool lets you create a copy of an object, with the clone option if
needed.
The copy tool lets you create a copy of an object, with the clone option if
needed.
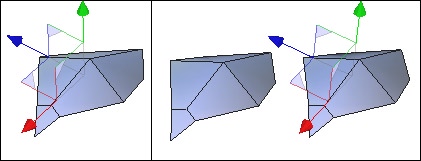
Left: The original object. Right: the same object and its copy.
Usage:
Options:
Remarks:
Keyboard shortcut: Space bar: Lets you apply a horizontal, vertical or no constraint when moving the copy.
![]() The multiple copies tool lets you make multiple copies of a selected object,
with the clone option if needed. You can also apply precise multiple modifications
to all copies, if needed.
The multiple copies tool lets you make multiple copies of a selected object,
with the clone option if needed. You can also apply precise multiple modifications
to all copies, if needed.
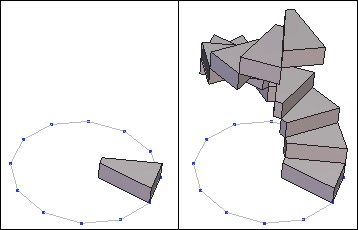
Left: the original object. Right: the multiple copies of this object with rotation and movement applied to each copy.
Usage:
Options:
![]() Unlike the multiple copies tool, this tool bases itself on a structure to
generate multiple copies. This structure could be a surface, volume or 2D curve.
Unlike the multiple copies tool, this tool bases itself on a structure to
generate multiple copies. This structure could be a surface, volume or 2D curve.
It the case of a 3D form, the tool bases itself on each polygon, and with a 2D curve, on its vertices.

Left: the object to be duplicated and the support object. Right: the result of the copy.
Usage:
Options:
![]() The cut into slices tool lets you cut an object into parallel slices, perpendicular
to a line indicating the first and last slice, which generates a user defined
amount of slices, or cross sections, describing the outer contour of the object.
The cut into slices tool lets you cut an object into parallel slices, perpendicular
to a line indicating the first and last slice, which generates a user defined
amount of slices, or cross sections, describing the outer contour of the object.
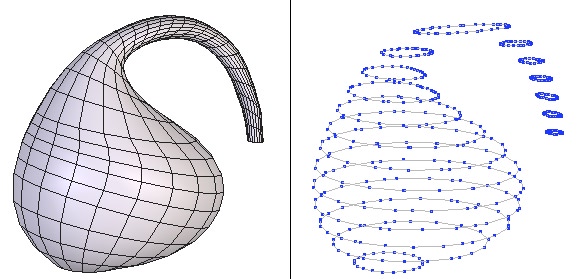
Left: the original object. Right: the object cut into slices.
Usage:
Remarks:
Keyboard shortcut: +/- (numbers keypad): increases or decreases the number of slices.
![]() The hide tool lets you make an object in the scene disappear temporarily.
The object is not deleted, but is hidden and is still present in the scene tree of the
Properties panel. You can unhide the object as needed.
The hide tool lets you make an object in the scene disappear temporarily.
The object is not deleted, but is hidden and is still present in the scene tree of the
Properties panel. You can unhide the object as needed.
Usage:
Options:
Remarks:
Keyboard shortcut: Ctrl/Command + Shift + H
![]() The show tool unhides previous hidden objects.
The show tool unhides previous hidden objects.
Usage:
Options:
Remarks:
Keyboard shortcut: Ctrl/Command + H
![]() The group tool lets you temporarily associate several objects together, to
create one manipulatable element, or to simplify and organize a complex scene.
The group tool lets you temporarily associate several objects together, to
create one manipulatable element, or to simplify and organize a complex scene.
It is also possible to make groups of groups, for example make two groups into one group.
When creating a 3D model of a car it would be useful to create a group for the body, wheels, motor parts, etc., organizing your model in a logical fashion. You would also then be able to hide and show whole groups at a time.
Usage:
Options:
Remarks:
Keyboard shortcut: Ctrl/Command + G
![]() The ungroup tool lets you break apart the individual elements of a group
association.
The ungroup tool lets you break apart the individual elements of a group
association.
Usage:
Remarks:
Keyboard shortcut: Ctrl/Command + Shift + G
![]() The orient normals tool lets you define the orientation, or the face’s front
and back, of a face or selection of facets. This orientation is very important,
because certain tools use the normal to make their calculations, such as the thickness
tool for example, and certain programs do not show or render the back sides of
polygons.
The orient normals tool lets you define the orientation, or the face’s front
and back, of a face or selection of facets. This orientation is very important,
because certain tools use the normal to make their calculations, such as the thickness
tool for example, and certain programs do not show or render the back sides of
polygons.
The front face of the polygon is symbolized as an arrow
Usage:
Options:
Remarks:
Keyboard shortcut: Space bar: lets you flip the normal of the selected face.
![]() The decimate tool lets you simplify an object by deleting polygons while
conserving the global aspect of the object.
The decimate tool lets you simplify an object by deleting polygons while
conserving the global aspect of the object.

From left to right: the original object, with higher decimation values.
Usage:
Remarks:
Keyboard shortcut: +/- (number keypad): increases or decreases the amount of decimation.
![]() The extract the openings tool functions like the close tool in the Vertex
Modeling tab, letting you select the openings on an object to close them, except this
tool creates the closures as a new object, unattached to the original.
The extract the openings tool functions like the close tool in the Vertex
Modeling tab, letting you select the openings on an object to close them, except this
tool creates the closures as a new object, unattached to the original.

From left to right: the object with its openings, the extracted openings, then moved.
Usage:
Options:
![]() The triangulate non planar facets tool lets you transform into triangles the
polygons of a selected object the points of which are not in the same plane.
The triangulate non planar facets tool lets you transform into triangles the
polygons of a selected object the points of which are not in the same plane.
Usage:
![]() The triangulate n-gons tool lets you divide any polygon made up of more
than four points into triangles.
The triangulate n-gons tool lets you divide any polygon made up of more
than four points into triangles.
This tool is useful when exporting to certain programs that do not support an object made up of polygons that are not triangles or quadrangles.
Usage:
![]() The merge duplicate points tool lets you delete any points that might be
overlapping, or are one on top of another.
The merge duplicate points tool lets you delete any points that might be
overlapping, or are one on top of another.
This tool is useful when exporting to certain programs that do not support overlapping points.
Usage:
![]() The merge duplicated UVs tool enables you to remove UV coordinates
that could be duplicated, e.g. one on the other.
The merge duplicated UVs tool enables you to remove UV coordinates
that could be duplicated, e.g. one on the other.
Usage:
![]() The merge coplanar facets tool lets you combine any facets that share an
edge and are in the same plane.
The merge coplanar facets tool lets you combine any facets that share an
edge and are in the same plane.
Usage:
Remarks: